The Data Uploads allows you to load structured data (CSV or XLSX files, optionally zipped) into a specific partition. You can perform manual uploads, quick uploads, or configure automated uploads through Integration As A Service (IaaS).
You can access this Data Uploads under:
Partitions > {PartitionName} > Data Management > Data Uploads
Supported Entities
The following partition entities can be updated using data uploads:
-
BoM Data
-
Company Parameters
-
Competition Data
-
Condition Records
-
Customer
-
Customer Extension
-
Data Source
-
Live Price Grid (LPG) – only overridable fields are supported for update
-
Live Price Grid Matrix
-
Manual Price List – only overridable fields are supported for update
-
Matrix Price List – only overridable fields are supported for update
-
Price Lists – only overridable fields can be updated, and new items cannot be created via Data Upload.
-
Product
-
Product Extension
-
Product Reference
-
Seller
-
Seller Extension
-
Users (to import users to a partition)
Note: PlatformManager sends only the correct types to Pricefx. All simple types supported by the partition and not bound to partition-specific configuration are accepted.
Support for Creating New Table
For the following entities, PlatformManager can create the target table during a Data Upload. This removes the need to create tables directly on the partition – handy when you find out that the table you need is not on the target partition.
The process consists of two steps:
-
Set the new table general properties
-
Adjust field types (supported for CX, PX, and SX tables).
New tables can be created for:
-
Customer Extensions (CX)
-
Product Extensions (PX)
-
Seller Extensions (SX)
-
Company Parameters (CP)
Supported File Formats
PlatformManager supports the following file formats for upload:
CSV
-
Files containing the BOM character are supported.
-
UTF-8 encoding is recommended.
-
Maximum file size: 2048 MB.
XLSX
The file must meet these criteria:
-
The file has only one sheet.
-
The data start in the first cell of the first column (cell A1).
-
The first row is a header.
-
No macros.
-
No formulas.
-
Maximum file size 20 MB.
ZIP
-
CSV and XLSX files may be zipped.
-
ZIP files inherit the maximum upload file size (2048 MB).
Data Upload Types
The New Data Upload menu provides three options:
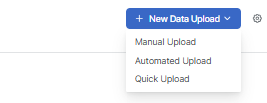
Manual Upload
Allows full configuration of a Data Upload. Steps include:
-
File selection
-
Parsing options
-
Field mapping (from your CSV / XLSX file to the Pricefx fields)
-
Optional field manipulation
-
Upload options (schedule time for manual execution)
For detailed steps, see How to Upload Data to Partition.
Automated Upload
Creates an automated, recurring upload using Integration As A Service (IaaS).
Automated uploads:
-
Run on a defined schedule or event trigger
-
Use the IaaS execution model
-
Support monitoring, notifications, and override rules
For configuration details, see: How to Create Automated Data Upload.
Quick Upload
Allows you to skip the parsing and field mapping step. The only required inputs are the CSV / XLSX file (can be zipped) and selecting the entity to update.
The file must:
-
Exactly match the target table structure
-
Use a comma delimiter
-
Contain a header row
If the structure does not match, validation fails and the upload stops.
Maximum file size: 2048 MB
Data Uploads Overview
In the Data Uploads section you can see an overview of all existing data uploads.
Status Widget
The Status Widget provides a summary of data upload runs for the specified period (default is Last 30 days).
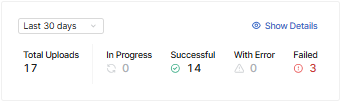
It displays the following statuses.
-
Total Uploads
-
In Progress
-
Successful
-
With Error
-
Failed
Each status is clickable. When you click a status, the History of Runs screen is displayed with the corresponding filters applied. The Show Details link opens the History of Runs without any filters applied.
Overview Table
The table includes the following columns to help you identify and manage your uploads:
-
Name
-
Target Entity Type/Name
-
Type (Manual, Automated)
-
ID – The unique identifier for the Data Upload. This ID corresponds to the folder name in the SFTP directory structure, allowing you to navigate to the correct location for file management.
-
Frequency (for automated uploads)
-
Last Upload
-
Next Run
You can filter by name, target entity type, upload type, and time range.
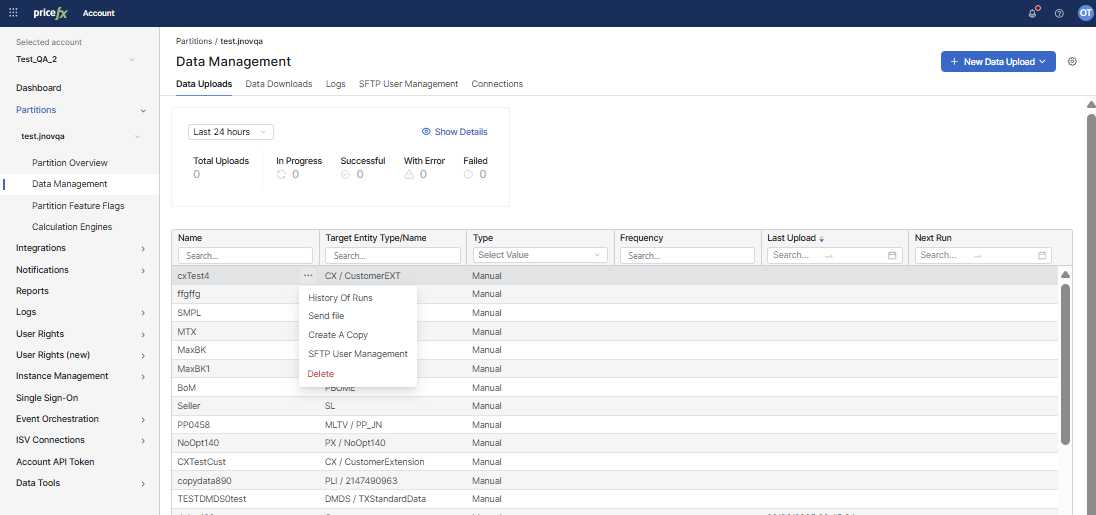
Row Menu Actions
Each Data Upload provides the following actions from the row menu (three-dot menu):
Edit
Available only for Automated Data Uploads.
The Edit screen displays the non-editable ID of the upload for reference. The following sections can be edited:
-
Data Mapping
-
Scheduling and Archiving
-
Advanced Options
History of Runs
Displays the upload execution history. See History of Runs.
Send File
Uploads a new file for an existing data load. It follows the same steps as when creating a new data upload.
-
It is possible here to lock the data upload configuration options and allow users only to upload a new file. To do that, assign the users the permission Partition Data Upload - use.
-
Only users with the permission Partition Data Upload - edit can modify data upload configuration options.
Create a Copy
Copies the configuration of a Manual or Automated Data Upload to one or more partitions within the same account. This allows you to replicate integration settings (such as archiving, scheduling, and advanced options) across environments without manual reconfiguration.
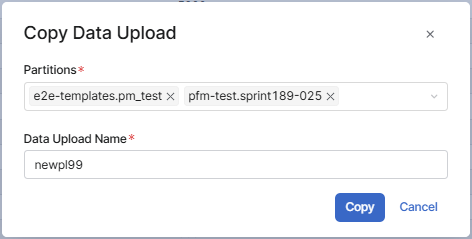
-
Click the 3-dot menu next to the upload and select Create a Copy.
-
In the Copy Data Upload dialog, select one or more Partitions from the dropdown.
-
Enter a Data Upload Name. By default, the original name with a "copy" suffix is prefilled.
-
Click Copy.
For Automated Data Uploads, the system automatically provisions a new SFTP user for the copied upload. PlatformManager sends an email containing the new SFTP credentials to the user who performed the copy action.
SFTP User Management
Allows you to define a new SFTP user for each Data Upload. Then you can connect via this new user to the SFTP server, upload data (ZIP, CSV, XLSX) directly to the SFTP and this data are processed via the given Data Upload.
-
The SFTP User Management screen displays the ID in brackets next to the upload name to help you identify the correct SFTP folder.
-
When you open the edit form, you will see the connected SFTP server. When adding a new user, you need to specify a name and authentication method for the user: password or SSH Public Key is mandatory.
-
You can also enter one or more email addresses of users who should be notified when the Data Upload is completed.
-
⚠️ Each SFTP client may have its own settings to be able to upload and process a file via Data Upload successfully. For example:
-
WinSCP tries to set permissions for the uploaded file. Here is a solution.
-
When you upload a large file via WinSCP, it is moved with .filepart extension. Here is a solution.
In addition, there is the Upload Queue section which shows you a list of all running/waiting Data Uploads to the partition and you can stop or cancel the upload there.
Archived Files
The Archived Files option allows you to access files that were archived from Automated Data Uploads when file archiving is enabled. Archived files remain available until the configured retention period expires.
Required permission: Data Management – edit
-
Go to Partitions > Data Management > Data Uploads.
-
Locate an Automated Data Upload.
-
Click the 3‑dot menu next to the upload.
-
Select Archived Files.
The Archived Files option is available only if Archive processed files is enabled for the upload.
Archived Files Table
The Archived Files view displays files archived from the selected automated upload.
Columns
-
File Name – Name of the archived file. Click the name to download the file.
-
Size – File size.
-
Uploaded At – Date and time when the file was uploaded.
-
Uploaded By – Source that uploaded the file.
A message at the top of the page indicates that files expire after the configured retention period.
Download Archived Files
You can download archived files individually.
-
Open Archived Files for the automated upload.
-
Click the 3‑dot menu next to a file.
-
Select Download.
Delete Archived Files
You can delete archived files manually before the retention period expires.
-
Open Archived Files for the automated upload.
-
Click the 3‑dot menu next to a file.
-
Select Delete.
-
Confirm deletion in the Delete Archived File dialog.
Deleting an archived file is permanent and cannot be undone.
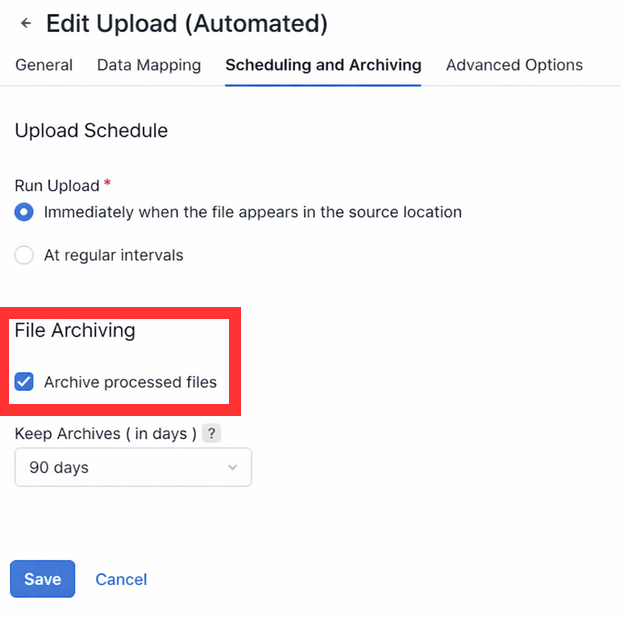
Configure File Archiving
File archiving is configured per automated upload.
-
Open an Automated Data Upload for editing.
-
Go to the Scheduling and Archiving tab.
-
Enable Archive processed files.
-
Set Keep Archives (in days) to define the retention period.
-
Click Save.
Only uploads with archiving enabled expose the Archived Files option.
Delete
Deletes the given automated Data Upload, including:
-
its History of Runs (History of Runs)
-
any SFTP users (SFTP User Management) that have access only to this upload
Validation
The following types of validation take place:
-
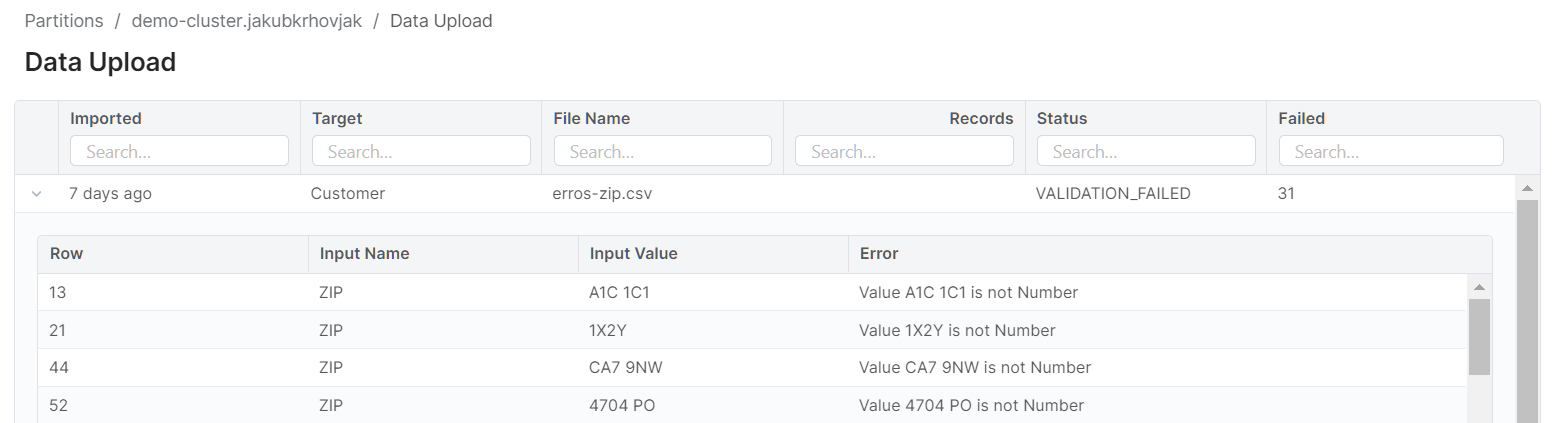
Before data upload – If the CSV / XLSX file has correct types String, Number, Date and DateTime. In case of an error, the file is not uploaded and the affected lines are displayed.
-
During data upload – If the business key length is within limit. You have the option to restrict the length of individual attributes used in the business key or reduce the number of used attributes.