|
Aim of this article |
Explains how to upload a CSV / XLSX data (preferably in UTF-8) file (even zipped) to a selected partition. Note: When there is a Data Upload in progress, it is not possible to start a new one at the same partition; there is a message displayed to inform you about this. |
|---|---|
|
Related sections |
|
|
Required permissions |
If Data Upload is used for importing users into PlatformManager:
|
|
Prerequisites |
You have prepared a clean data to upload. |
Steps:
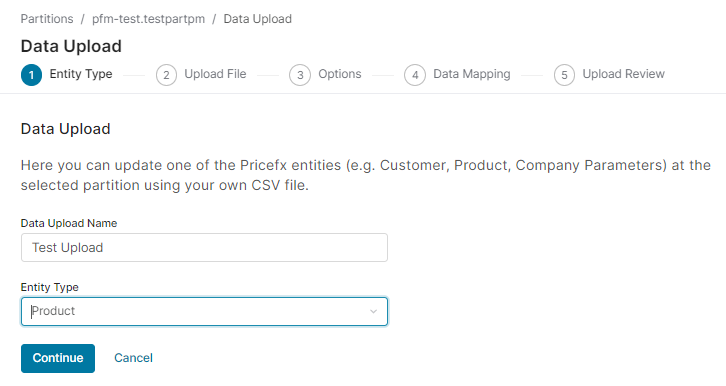
1. Entity Type
-
Navigate to Data Management > Data Uploads > New Data Upload > Manual Upload.
-
Provide Data Upload Name and select the Entity to be updated.
See a list of supported entities; for some of the entities, you can create the corresponding table directly from here and also change the field types.
2. Upload File
Provide here the file whose fields correspond to the entity you are going to update.
In the following steps, you will map the fields to the mandatory/optional Pricefx fields.
You can choose between two options:
-
Upload new File – upload a CSV, XLS, XLSX, or ZIP file.
See what the requirements for the file formats are.
-
Select from recent uploaded – reuse a previously uploaded file. A list of available files displays with the file Name and Upload date.
⚠️ Note: Preferred file encoding format is UTF-8. The maximum file size limit is 2048 MB.
If your data file is prepared to exactly match the fields at the partition, you can use Quick Data Upload and thus skip the following steps.
You can also use a direct upload to SFTP server which triggers a Data Upload process for the given file. For details see the SFTP User Management option in the Data Uploads table.

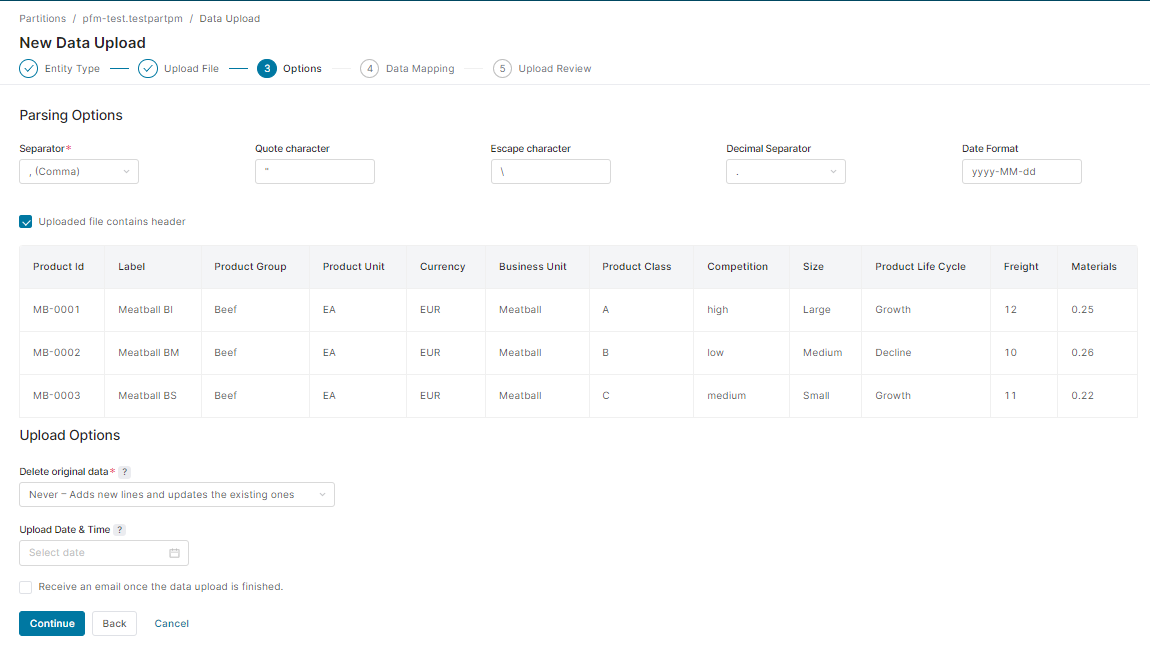
3. Options
A sample from your data is displayed and you can specify the following:
-
Parsing options – Determines what is used in your data file as a separator, quote and escape characters and decimal separator. The most common separators can be selected from a drop-down menu. You can also define the date format here.
-
Uploaded file contains header – Indicates if your CSV / XLSX file has a header or not. If there is no header, generic header names “column1”, “column2”, etc. will be used.
Uploading with no header is not supported when using the Quick Data Upload.
-
Upload options
-
Delete original data – Determines what happens to the existing data on the server for the given entity:
-
Never – No data is deleted. The process works as UPSERT. It adds new lines and updates the existing ones.
-
Before upload – The data is replaced by this data upload. This helps you prevent duplicate data on the server in case you cannot ensure a unique ID for each record.
-
After upload – After a successful import of a new file all non-updated records of a given entity are deleted.
-
-
-
Upload Date & Time – Allows you to postpone data upload so that it does not interfere with your daily operations and you do not have to wait until off-hours to perform an upload. A list of scheduled Data Uploads can be found in the Upload Queue.
-
Receive an email once the data upload is finished – If checked, you will be notified by email when the data upload is complete.
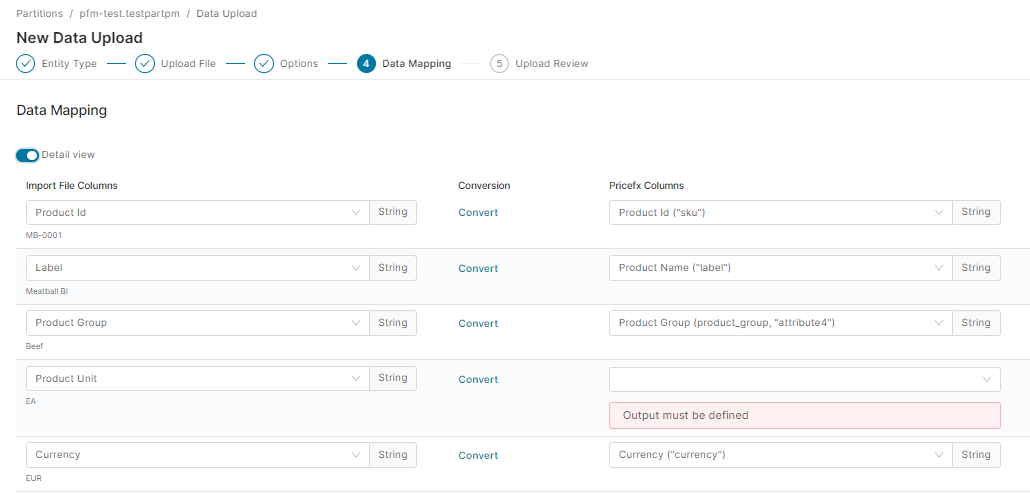
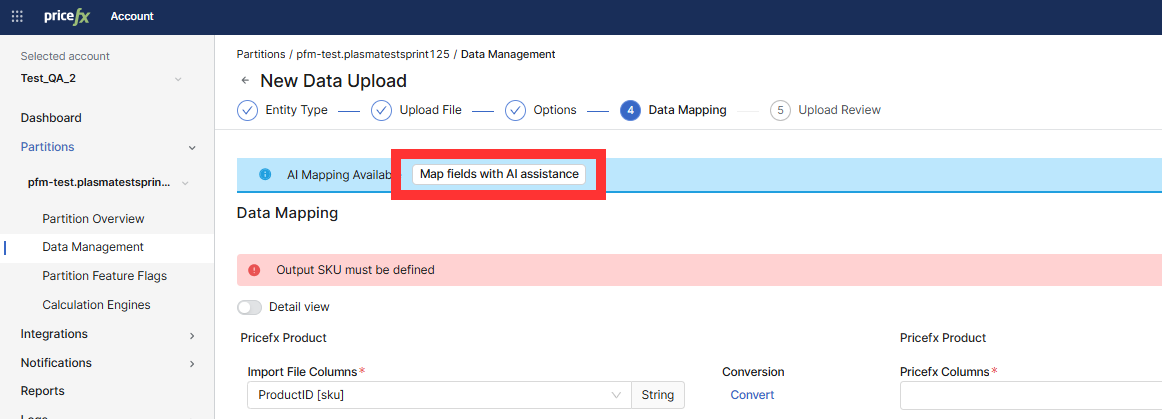
4. Data Mapping
Define which fields from your CSV / XLSX file correspond to the fields at your Pricefx partition. You can also define data types conversions in this step.
You have the following options:
-
Import File Columns – Lists all of the found fields in the CSV / XLSX file and lets you select for them corresponding output fields. You can also manipulate the data after you click the Convert link and open the Advanced Field Editor.
-
Pricefx Columns – Allows you to select the corresponding Pricefx field where the information from the CSV / XLSX file should be sent.
-
The output field data type is read directly from the partition.
-
This output type determines what options are available to manipulate the data (e.g. if it is number, you can write a formula using your input fields). For details see Advanced Field Editor.
-
AI-assisted mapping
If Map fields with AI assistance is available, use it to generate suggested mappings for the current file.
-
Click Map fields with AI assistance.
-
Wait until the mapping finishes (the page shows a progress indicator).
-
When the system applies the mapping, review each suggestion and adjust it as needed.
Note: If AI-assisted mapping does not complete or is not available, map fields manually.
Additional options
-
You can manipulate the data in various ways after you click the Convert link. For details see Advanced Field Editor.
-
You can also add your own new field (using the button at the bottom of the page).
-
You can decide how empty values should be passed on. You have two options:
-
Send empty value as empty string ""
-
Send empty value as NULL
-
-
When you map multiple fields, the definition is stored as a list of fields to combine. When sending the file again, it is shown as the same multiple fields definition.
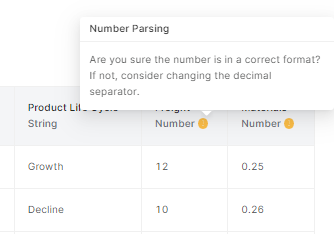
Invalid values, such as "10A" cannot be converted (e.g., StringToInteger cannot convert value 10A to integer").
You can speed up the Data Mapping step using field aliases (alternative names). The source file fields will get mapped to the Pricefx fields automatically if their name matches either the exact Pricefx field name or one the aliases. The aliases are defined in a step via mappingAliases in mandatoryFields and they are not case sensitive.
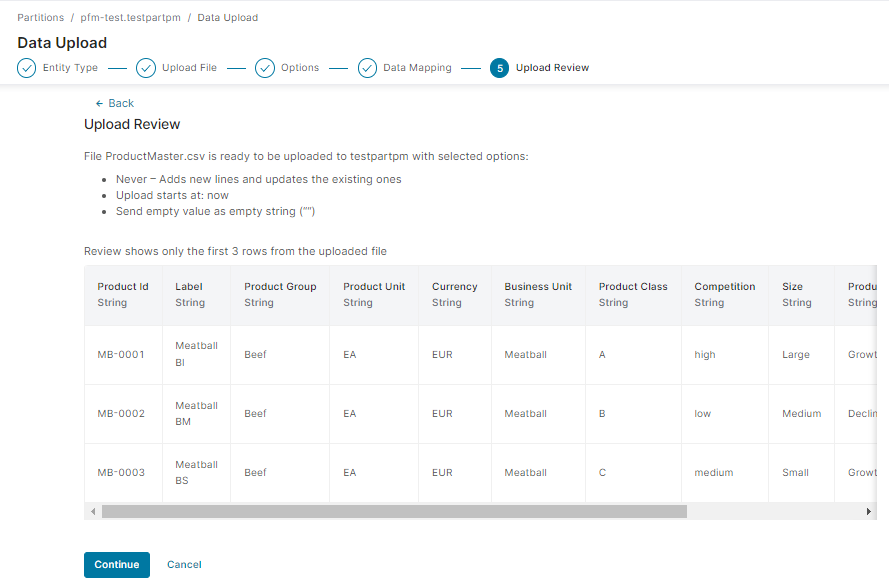
5. Upload Review
In the next step you can review all of your Data Upload settings. Sample data are shown with conversions applied (if there were any). If needed, you can go back and change some of the settings.
PlatformManager also provides you with hints and warnings:
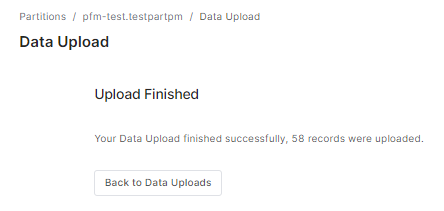
6. After you confirm this step, the upload starts. After successful completion, you get a confirmation. If there were errors, you are notified too.
If the Data Upload task takes long, you will be notified by email when it is completed. Later, you can check the results in the Data Upload history.
All running/waiting Data Uploads are also listed in Upload Queue where you can cancel or stop them if needed.