This article describes how to create an automated Data Upload that uses Integration As A Service (IaaS). Automated uploads process files that appear in the configured source location (SFTP) or run at a defined interval. Automated uploads are suitable for recurring integrations that do not require manual execution.
You can access Automated Uploads under:
Account > Partitions > {PartitionName} > Data Management > Data Uploads > +New Data Upload > Automated Upload
IaaS-based uploads are optimized for processing larger data files rather than a high volume of small files. Because IaaS containers may take up to one minute to start, high-frequency uploads of very small files are not recommended.
Prerequisites
-
The IaaS feature flag (
use-iaas) must be enabled. -
An SFTP connection for the partition must be configured.
When you create a new automated job, SFTP credentials are automatically created and emailed to the job’s creator. They also appear under the SFTP User Management tab (SFTP User Management).
-
The user must have the permission
Partition Data Management – edit.
Step 1: General
-
Navigate to +New Data Upload > Automated Upload.
The General step appears. -
Enter a Name for the automated upload.
The name identifies the upload in the Data Uploads list. -
Select the Entity Type into which the data will be loaded.
Supported entities include Product, Customer, Price Parameters, Extensions, and other entities.
(Automated uploads support the same entities as manual uploads: CRCS, LPG, XLPG, C, MPLI, MLTV, SX, PX, DCRI, PLI, P, PBOME, U, CX, DMDS, SL, PCOMP, PXREF, XPLI) -
Click Next.
Step 2: Upload a Sample File
The system requires a sample file to detect the column structure and data types of future uploaded files.
The sample file itself is not imported into the partition.
-
Upload a sample file in CSV, XLSX, or ZIP format.
-
Preferred encoding: UTF-8
-
Maximum file size: 2048 MB
-
-
Review the preview of the first rows.
If the sample file includes a header, enable Uploaded file contains header. -
Adjust parsing options if needed:
-
Separator
-
Quote character
-
Escape character
-
Decimal separator
-
Date format
-
-
Click Next.
Step 3: Configure Data Mapping
In this step, map the fields from the sample file to the corresponding Pricefx fields.
The system maps fields it can match by similar names. If Map fields with AI assistance is available, you can use it to generate additional suggested mappings.
-
Review the fields that the system maps automatically.
The system maps fields with similar names. -
(Optionally) Generate mappings using AI.
-
Click Map fields with AI assistance.
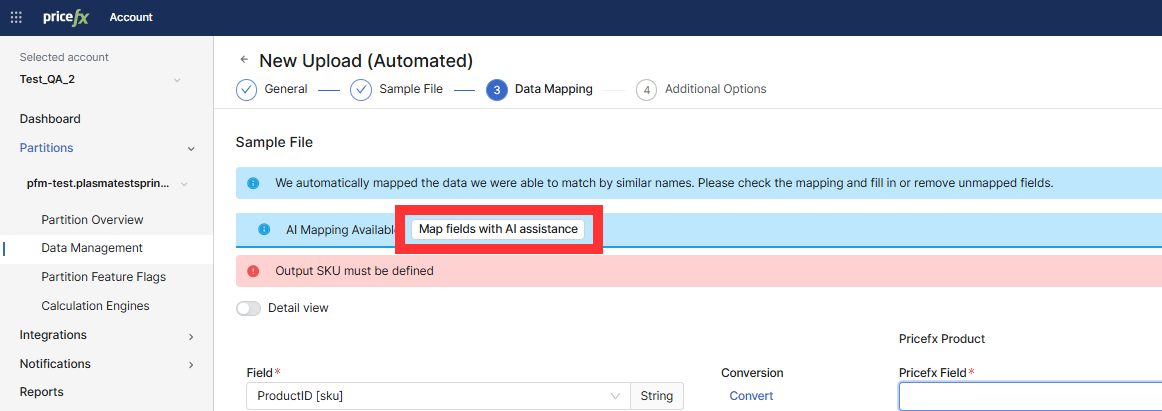
-
Wait until the system finishes generating the mapping (the page shows a progress indicator with the message “We are using AI to create the field mapping”).
-
When the banner AI mapping applied displays, review the suggested mappings.
-
Note: If AI mapping does not complete, continue with manual mapping (AI service may be temporarily unavailable).
-
For each unmapped or incorrectly mapped field:
-
Select the correct Pricefx Field.
-
Optional: Click Convert to open Advanced Field Editor and adjust data type or format.
-
Optional: Remove fields you do not want to import.
-
-
Continue until all required Pricefx fields display a valid Pricefx Field output mapping.
-
Click Next.
Step 4: Configure Additional Options
This step defines how the upload behaves at runtime.
Send Empty Value As
Select how empty values in the file are interpreted:
-
Empty string
-
Null
Delete Original Data
Controls how the system handles pre-existing records before inserting new data:
-
Never (default): Adds new lines and updates existing records.
-
Before upload: Replaces all existing data with the new upload.
-
After upload: Removes records that are not present in the new file.
Before upload and especially After upload can result in destructive data loss if misconfigured.
Upload Schedule
Choose how the automated upload is triggered:
Immediately when the file appears in the source location
The upload starts as soon as a new file is detected in the defined SFTP folder.
At regular intervals
If selected, configure:
-
Timezone
-
Interval Type (Minutes, Hours, Days)
-
Interval Period
-
Starting At (time of day)
The system displays the calculated First Run time.
Important:
Because IaaS containers require spin-up time (up to ~1 minute), avoid extremely short intervals if files are small or frequent.
File Archiving
Archived files are moved into the archive folder managed by IaaS.
This helps you control how long past uploads remain available for reference or audit purposes.
If you choose to Archive processed files, you can decide how long they should be kept (retention period).
The Keep Archives dropdown provides three options:
-
90 days – Keeps archived files for a short-term period.
-
180 days – Keeps them for a medium-term period.
-
365 days – Keeps them for a full year.
After the selected time has passed, the files are automatically removed.
Changing the archive period
When you edit an existing Automated Data Upload and change the Keep Archives value, an additional option appears:
Apply the new value to previously archived files – If enabled, the new retention duration is applied to all existing archived files created by this upload.
This can result in immediate deletion of older archived files if the new retention period is shorter than before
(e.g., reducing 365 days > 180 days will delete any files older than 180 days).
Advanced Options
-
Flush data automatically after loading to data feed
Automatically runs the configured Flush Data Load right after the file is written to the Data Feed (only when Direct load = No). The flush moves the new rows into the Data Source and then clears the processed rows from the feed. Execution starts as soon as the background queue allows. -
Character set used to process the input file (default: UTF-8)
Use this option if your files use ISO-8859-1, Windows-1252, or other legacy encodings. -
Maximum data batch size: Defines the number of processed rows per batch.
-
Create internal copy after loading data
-
If enabled, specify the Internal Copy Name.
-
Notifications
When configuring notifications for an Automated Data Upload, you can define one or more conditions that trigger an email.
-
Click New Notification.
The Add Notification dialog appears. -
Enter a Name for the notification.
-
In Trigger By (State), select one or more states that should trigger the notification.
-
Success
-
Error
-
-
In Emails for notifications, enter one or more email addresses.
PlatformManager sends a notification email to all listed recipients when the selected state occurs. -
Click Create.
The notification is added to the Automated Upload configuration and will be applied to all future executions.
Step 5: Create the Automated Upload
-
Review all settings.
-
Click Create.
The automated Data Upload appears in the list. The Last Upload and Next Run columns update when the system processes files.
SFTP credentials are automatically created and emailed to the data upload creator. They also appear under the SFTP User Management tab (SFTP User Management).
Copying an Automated Data Upload
You can create a copy of an existing Automated Data Upload to reuse its configuration on the same or a different partition within the same account. This is useful for deploying identical integration logic environments.
-
In the Data Uploads table, click the three-dot menu for the upload you want to copy and select Create a Copy.
-
In the Copy Data Upload dialog, configure the following:
-
Partitions: Select one or more target partitions where the copy should be created. This field is mandatory.
-
Data Upload Name: Enter a name for the new upload. By default, the system pre-fills this with the original name plus a "copy" suffix. The name is mandatory and must be unique within the target partition.
-
-
Click Copy.
When the copy is created:
-
All settings (Data Mapping, Scheduling, Archiving, and Advanced Options) are preserved from the original upload.
-
The system automatically provisions a new SFTP user for the copied upload.
-
New SFTP credentials are generated and emailed to the user performing the copy.
-
The original Automated Data Upload remains unchanged.
Monitoring the Automated Upload
After creation, you can monitor the given upload under History of Runs.
Automated uploads also appear in the Partition Overview > Upload Queue tab. See Partition Overview | Upload Queue.
Automated Data Upload Timeout
If an upload execution takes longer than the allowed processing time on the IaaS side, the upload is automatically cancelled. The job times out after 5 minutes.
When an automated Data Upload times out:
-
The upload status is set to
Canceled. -
The upload job is removed from the Upload Queue (Partition Overview | Upload Queue ).
-
The upload status is visible on the History of Runs page.
-
The user is notified via Notification Center.
-
A corresponding entry is written to the Activity Log.
The timeout affects only the current execution.
Future scheduled runs of the Automated Data Upload are not impacted.