
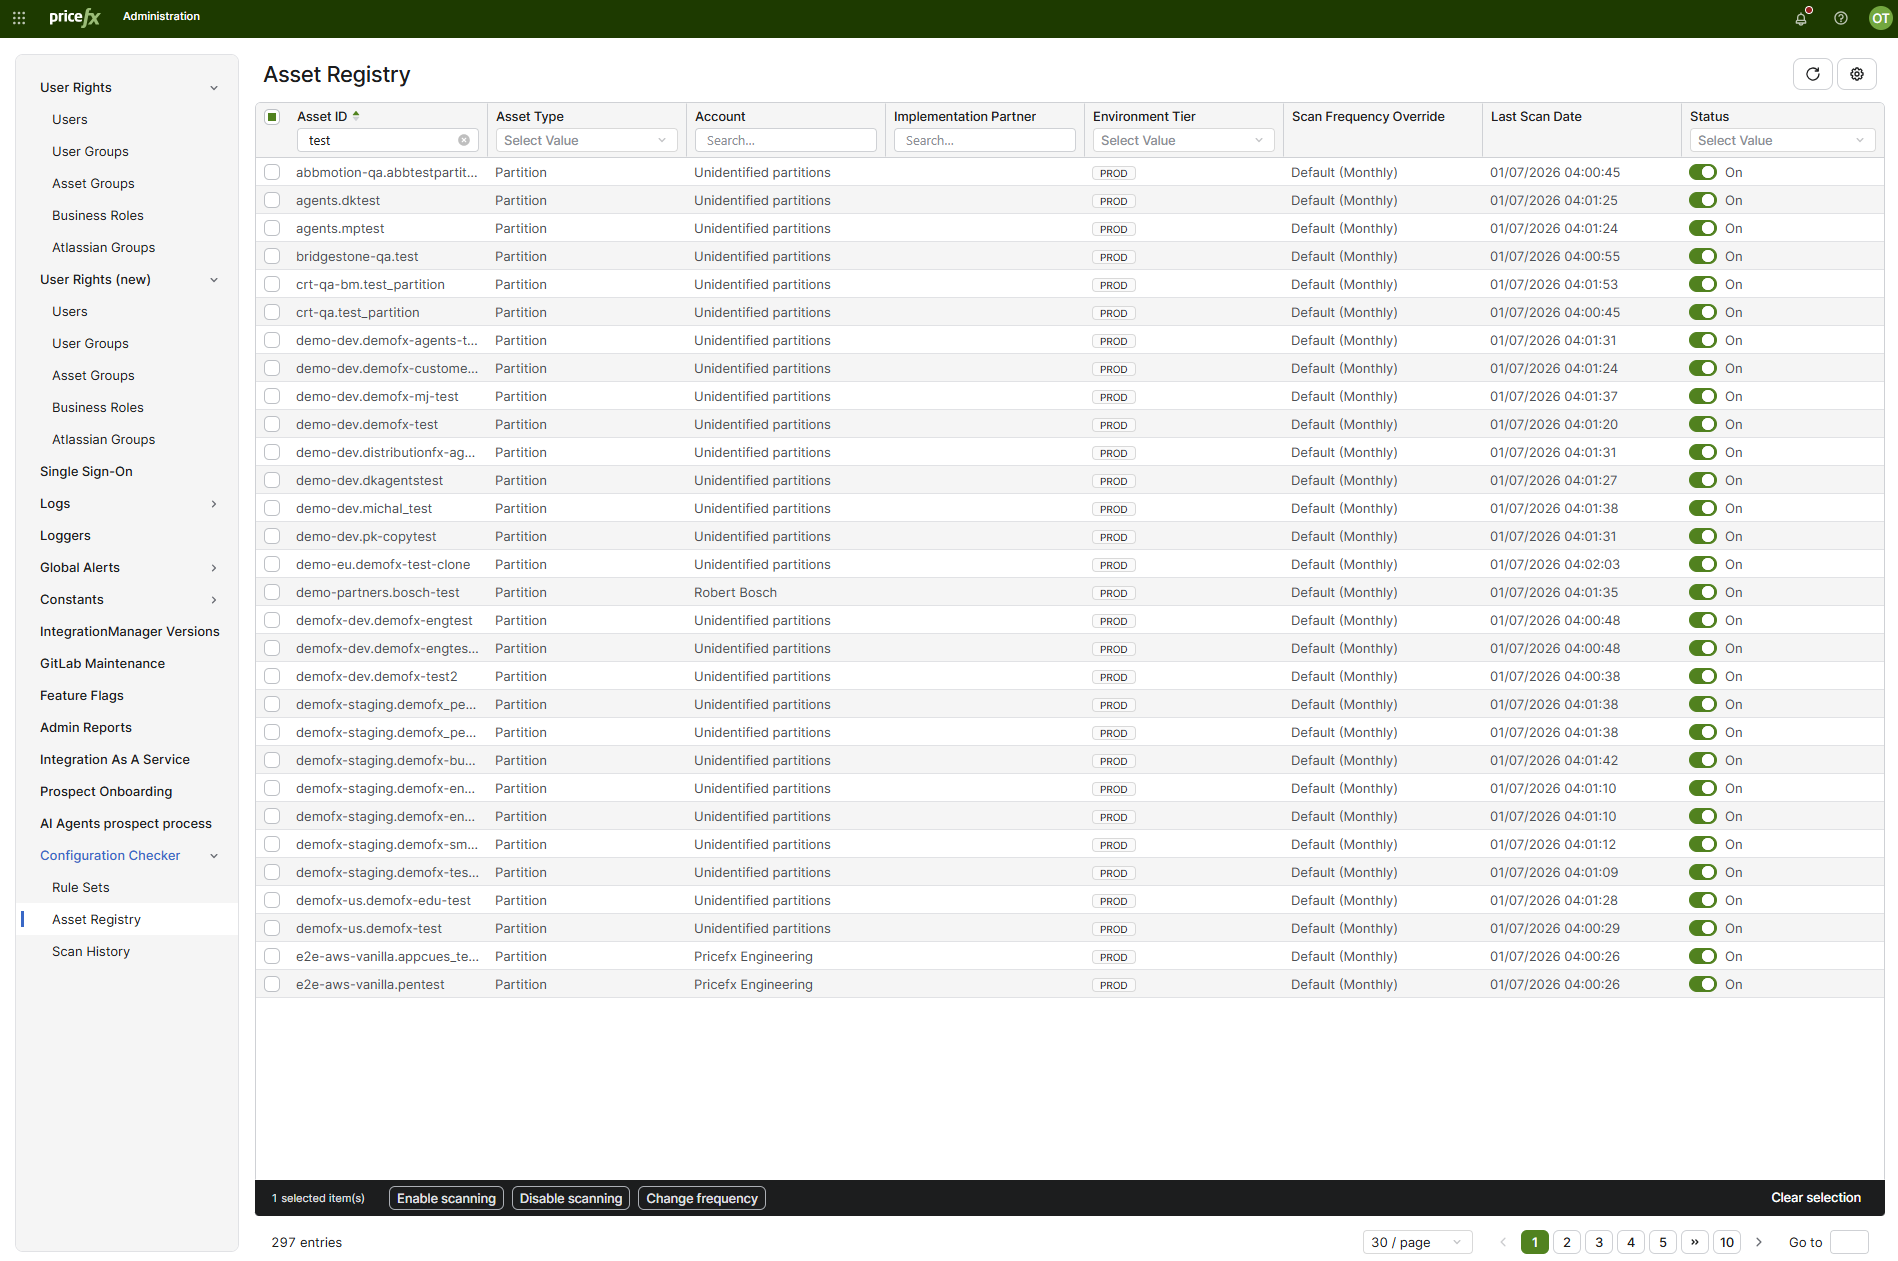
The Asset Registry lists all assets that the Configuration Checker can scan — partitions and provisioned IntegrationManager instances. The registry is populated automatically and controls which assets the scheduled code scans cover, how often each asset is scanned, and who owns it.
Location and Permissions
Path in UI:
PlatformManager > Administration > Configuration Checker > Asset Registry
-
View:
Configuration Checker Assets - read(global permission). -
Edit, mass actions, and manual scans:
Configuration Checker Assets - edit(global permission).
How the Registry Is Populated
The registry fills automatically from the partitions and provisioned IntegrationManager instances that exist in PlatformManager. You cannot add or remove assets manually.
-
Manual (non-provisioned) IntegrationManager instances are not listed.
-
New assets are enabled for scanning by default.
-
When an asset is removed from PlatformManager, it becomes inactive and is excluded from scheduled scans; its registry settings are kept.
Asset Registry Table
|
Column |
Description |
|---|---|
|
Asset ID |
Identifier of the asset (the partition or the IntegrationManager instance). |
|
Asset Type |
Partition or Integration. |
|
Account |
Customer account the asset belongs to. Partitions without a matching account record are grouped under Unidentified partitions. |
|
Implementation Partner |
Implementation partner associated with the account. The value is synchronized from Salesfx together with the other account-level information. An account with no implementation partner recorded in Salesfx shows an empty cell. |
|
Environment Tier |
Purpose of the asset environment: PROD, STAGING, UAT, QA, DEV, DEMO, or INTERNAL. The value is pre-filled automatically: for partitions from the partition Environment value, for integrations derived from the instance name; PROD is used when the environment cannot be determined. You can change the value in the Edit Asset dialog. |
|
Scan Frequency Override |
How often the scheduled scan runs for the asset: Default (Monthly), Nightly, Weekly, or On-demand only. |
|
Last Scan Date |
Date and time of the last scan. Both scheduled and manual scans update this value. |
|
Status |
On/Off toggle. Assets switched to Off are excluded from scheduled scans. |
Scheduled Scans
The Configuration Checker scans enabled assets according to their scan frequency: nightly scans run every night, weekly scans run on Sundays, and monthly scans run on the first day of the month. Assets set to On-demand only are never scanned automatically; scan them manually with Run code scan.
Row Actions
Open the three-dot menu on an asset row to access the following actions:
-
Edit – Opens the Edit Asset dialog.
-
Run code scan – Starts a scan of the asset immediately.
-
Show Reports – Opens the scan reports for the asset (the same reports as on the Partition or Integration Overview).
-
Show Scan History – Opens the scan history for the asset. The scan history includes the Implementation Partner column as well, so a scan result can be attributed to the partner that configured the asset.
Editing an Asset
In the Edit Asset dialog you can change how the asset is scanned. The following fields are read-only: Asset ID, Asset Type, Account, Connection URL, and Cluster (the instance where the partition runs).
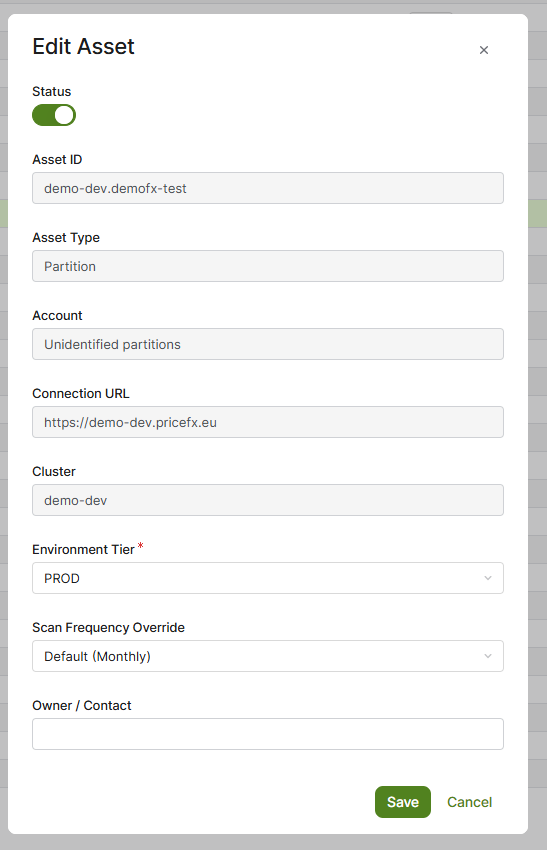
You can edit:
-
Status – Include or exclude the asset from scheduled scans.
-
Environment Tier – Required. Select the environment purpose: PROD, STAGING, UAT, QA, DEV, DEMO, or INTERNAL.
-
Scan Frequency Override – Select Default (Monthly), Nightly, Weekly, or On-demand only.
-
Owner / Contact – The person responsible for the asset.
Click Save to apply the changes.
Mass Actions
Select multiple assets using the checkboxes to apply a change to all of them at once. The available mass actions are Enable Scanning, Disable Scanning, and Change Frequency. Before the change is applied, a confirmation shows how many assets will be affected.
See Also
-
Rule Sets – The rule sets that the Configuration Checker scans apply.