
Customizing the Agents Accelerator is not recommended. For more information see Known Limitations and Risks.
Upgrading the Agents Accelerator should be treated as a project change rather than routine maintenance. Once the accelerator has been implemented as part of a customer solution, an upgrade may overwrite certain objects while leaving other configurations unchanged. Therefore, each upgrade must be carefully assessed, taking into account the customer's current accelerator version and any customizations.
See the Accelerator Upgrade Assessment first to determine whether an upgrade is required.
Prerequisites
Before starting the upgrade, ensure that all of the following prerequisites are met:
1. Access and Permissions
You must have access to both PlatformManager and the target partition, as the Agents Accelerator is deployed from the PlatformManager Marketplace.
For information about obtaining access and the required permissions, see Installation Prerequisites (Common for Accelerators).
2. Target Partition Readiness
Confirm that the target partition is ready for upgrade:
-
Ensure that the following accelerators are deployed:
-
Sales Insights (v1.13.0 or later)
-
Customer Insights (v1.11.3 or later)
-
Agents Accelerator (v1.0 or later)
-
The Agents Accelerator can be deployed without Sales Insights and Customer Insights, but with the following limitations:
-
You cannot add dashboards to Actions.
-
You cannot use the Dashboard Agent.
-
Verify that your Pricefx application is running version 15 or later and that the required core data (Products, Customers, and Transactions) is available and updated regularly. Otherwise, you will not be able to deploy the Agents Accelerator from the PlatformManager Marketplace.
-
Ensure that both DEV and QA environments are available for upgrade testing.
-
If a DEV environment is not available, perform all upgrade activities described in this guide in the QA environment instead.
-
3. Pricefx Studio Readiness
Ensure that Pricefx Studio is available for the source code and fetch workflows used during the upgrade.
This includes:
-
Pricefx Studio version 16.2 or later.
4. Project Knowledge Readiness
Before starting the upgrade, gather the information required to assess the upgrade impact.
4.1 Currently Installed Agents Accelerator Version
-
Identify the currently installed version of the Agents Accelerator.
-
If the installation process was followed correctly, your Git project repository should contain a commit indicating the installed version. The commit message typically follows this format:
PFAGENTS-123 Installation of Agents Accelerator 1.6
-
If no such commit exists, see 2. Identify Deployed Accelerators Version for alternative methods to determine the installed version.
-
You can also verify the version using the
deployedAcceleratorsCompany Parameter. During deployment, PlatformManager stores the deployed accelerator version in the Company Parameter table.
Example:
|
Company Parameter Option |
Company Parameter Value |
|---|---|
|
Name |
|
|
Value |
JSON
|
-
If you are still unable to determine the installed version, contact Support. They can verify it using the internal Accelerator Usage Finder tool.
4.2 Project Customizations
-
Determine whether the project contains customizations beyond the standard Agents Accelerator delivery.
-
If you are unsure whether the project has been customized, see How To Detect Customizations.
-
Although the official recommendation is not to customize the Agents Accelerator, it is important to identify any existing customizations before upgrading. This allows you to back up the project and reapply any required changes after the upgrade, if necessary.
5. Source Control and Backup Readiness
Before starting the upgrade, create backups of both the project source code and the current partition state. The objective is to establish a reliable rollback baseline before any package deployment or manual updates begin.
5.1 Back Up the Project Source Code
Back up the project by following 3. Ensure Accelerator Objects Are Backed Up or Already Stored in Git | Accelerator in Scope was Already Installed.
Verify that backups of the following accelerator source code are available in Git:
-
Sales Insights Accelerator
-
Customer Insights Accelerator
-
Agents Accelerator
-
Shared Library Accelerator
-
Dashboard Library Accelerator
5.2 Back Up Existing Agents
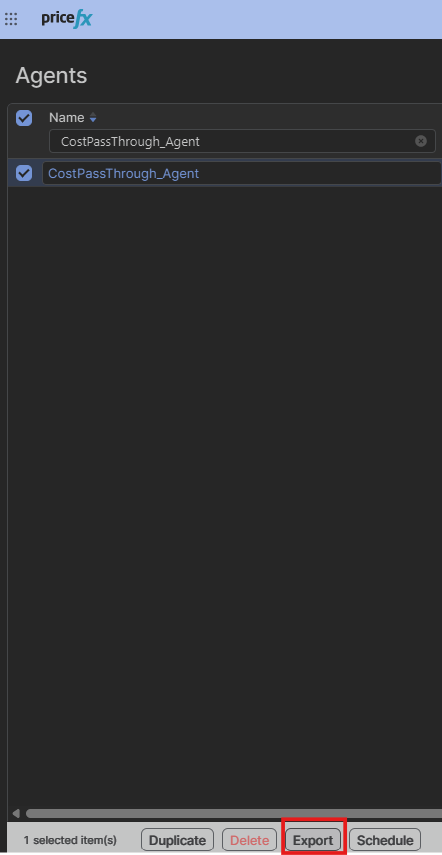
Back up the existing agents by exporting them and storing the exported archive in a SharePoint folder or attaching it to the corresponding Jira ticket. This ensures that the original agent definitions are available if a rollback is required.
To export agents:
-
In the target partition, from the Pricefx navigation menu.
-
Go to Pricefx Agents > Agents.
-
Select the agents you want to back up.
-
Click Export.
-
Save the generated
.zipfile to a SharePoint folder or attach it to the corresponding Jira ticket.
Example:
Upgrade Steps
Make sure all prerequisites are met before proceeding.
Upgrade Overview
The upgrade process consists of the following high-level steps:
-
Prepare and assess the upgrade in the DEV environment (or QA if a DEV environment is not available).
-
Deploy the upgrade to DEV using PlatformManager, then commit the changes to Git.
-
Perform the required manual post-upgrade steps in DEV, then commit the changes to Git.
-
Reapply any project customizations, if applicable, and commit the changes to Git.
-
Perform an initial round of smoke testing in DEV (or QA if a DEV environment is not available).
-
Merge the changes into the main Git branch (typically
master) so that the deployment pipeline can promote the upgrade to QA and PROD.
See Pricefx Git Workflow for more information.
-
Validate the upgrade in QA. Skip this step if you do not have a DEV environment and performed testing in QA during step 5.
-
Repeat the validation in the PROD environment.
Once you understand the overall upgrade process, follow these steps to upgrade the Agents Accelerator.
Deploy the Latest Version of Agents Accelerator and Commit to Git
-
In the PlatformManager Marketplace, select the Agents Accelerator package.
-
Select the target partition. Use your DEV environment whenever possible (or QA if a DEV environment is not available).
-
Select the latest available version (the topmost entry in the list).
-
Click Deploy.
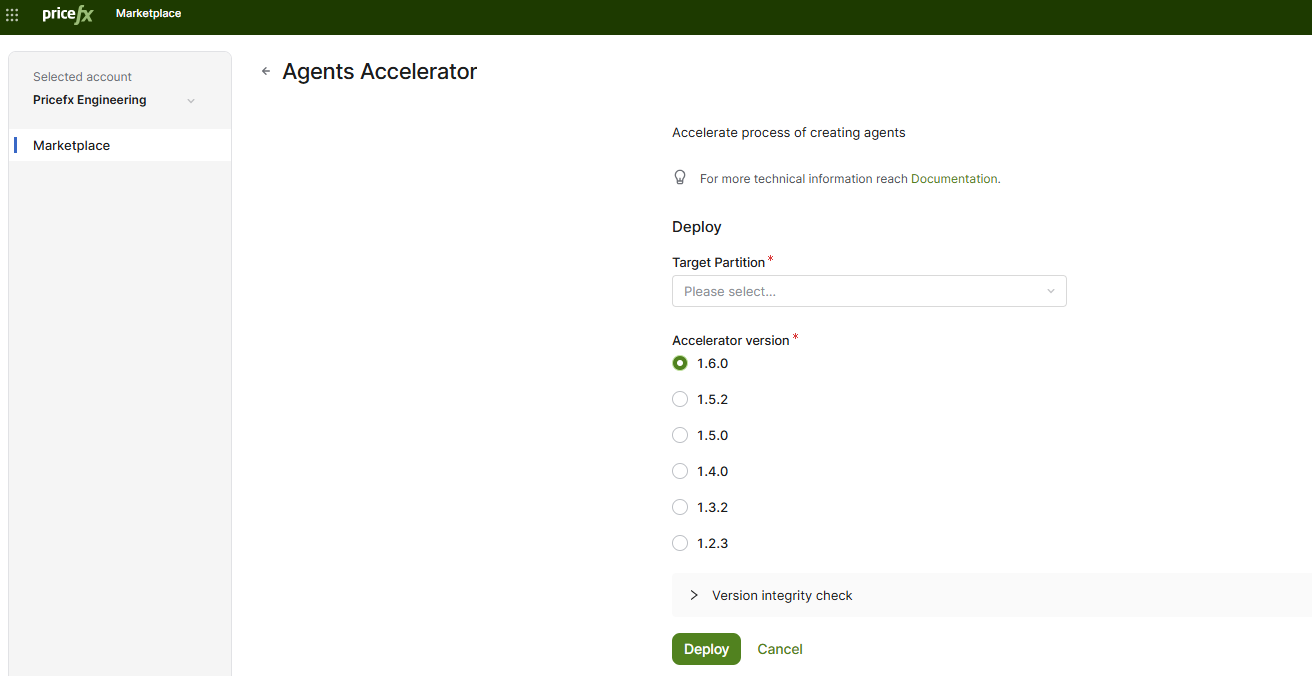
PlatformManager Marketplace page with the Agents Accelerator package selected.
Fetch Updated Source Code
-
Open IntelliJ IDEA with the Pricefx Studio plugin installed.
-
Open the Fetch tool window.
-
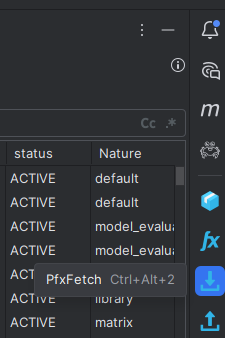
Select the
agents-acceleratorcomponent folder. -
Click Select all entities and their objects that exist in the selected directory (
-
Clear the Internationalization entity.
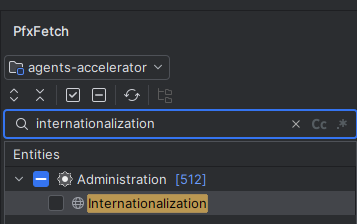
-
Click Fetch.
Commit Upgrade to Git
-
Create a new Git branch for the upgrade based on the main branch (typically
master).It is safe to apply the upgraded source code on top of existing project customizations, provided that all required backups have been completed as described in Source Control and Backup Readiness.
-
Commit the fetched changes to the new branch using a commit message similar to the following:
PFAGENTS-123 Upgrade to Agents Accelerator 1.6
Replace the ticket number and accelerator version as appropriate.
Deploy Latest Version of Agents Accelerator Dashboards and Commit to Git
The Agents Accelerator Dashboards package was introduced in version 1.2.2 after the dashboard objects were separated from the Agents Accelerator to avoid blocking deployments on Pricefx 14.x. Once all supported customer environments have been upgraded to Pricefx 15.x or later, this package will be merged back into the Agents Accelerator and this step will no longer be required.
Deploy Package
-
In the PlatformManager Marketplace, select the Agents Accelerator Dashboards package.
-
Select the target partition. Use your DEV environment whenever possible (or QA if a DEV environment is not available).
-
Select the latest available version (the topmost entry in the list).
-
Click Deploy.
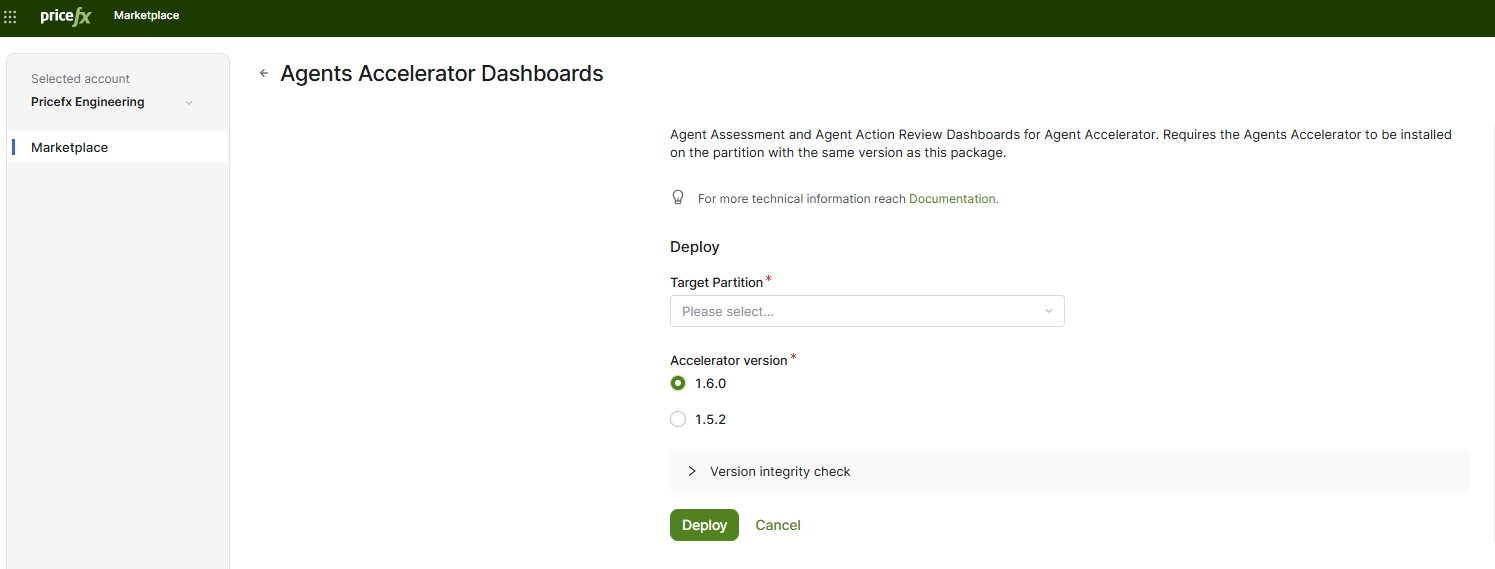
PlatformManager Marketplace page with the Agents Accelerator Dashboards package selected.
Fetch Updated Source Code
-
Open IntelliJ IDEA with the Pricefx Studio plugin installed.
-
Open the Fetch tool window.
-
Select the
agents-accelerator-dashboardscomponent folder. -
Click Select all entities and their objects that exist in the selected directory (
-
Clear the Internationalization entity.
-
Click Fetch.
Commit Upgrade to Git
-
Switch to the upgrade branch created in Step 1.
-
Commit the fetched changes using a commit message similar to the following:
PFAGENTS-123 Upgrade to Agents Accelerator Dashboards 1.6
Replace the ticket number and dashboard package version as appropriate.
Deploy Latest Version of Dashboard Library Accelerator and Commit to Git
Deploy Package
-
In the PlatformManager Marketplace, select the Dashboard Library Accelerator package.
-
Select the target partition. Use your DEV environment whenever possible (or QA if a DEV environment is not available).
-
Select the latest available version (the topmost entry in the list).
-
Click Deploy.
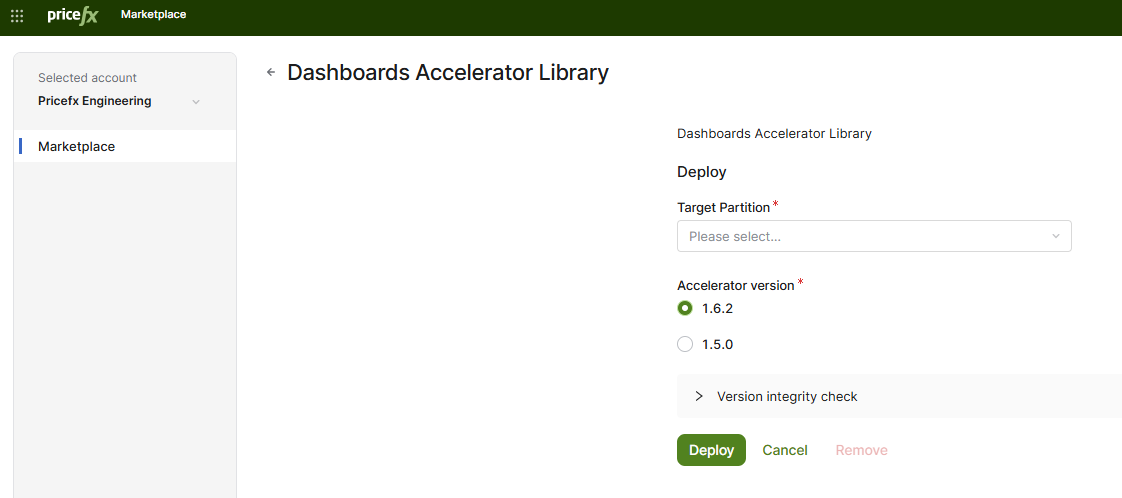
PlatformManager Marketplace page with the Dashboard Library Accelerator package selected.
Fetch Updated Source Code
-
Open IntelliJ IDEA with the Pricefx Studio plugin installed.
-
Open the Fetch tool window.
-
Select the
dashboard-library-acceleratorcomponent folder. -
Click Select all entities and their objects that exist in the selected directory (
-
Click Fetch.
Commit Upgrade to Git
-
Switch to the upgrade branch created in Step 1.
-
Commit the fetched changes using a commit message similar to the following:
PFAGENTS-123 Upgrade to Dashboard Library Accelerator 1.6.2
Replace the ticket number and accelerator version as appropriate.
Migrate Watchers (Optional)
If the Actionable Insights Accelerator was previously installed, migrate the existing Watcher model objects to Agent model objects by following the instructions in Migrate Watcher Model Objects to Agent Model Objects.
Perform Manual Post-Upgrade Steps
Some configuration changes must be applied manually after the deployment. If you already have backups of the configuration files described below, reapply them and skip the corresponding steps. Otherwise, create or update the configurations as described.
The examples below show the default values to use if the configurations have not been defined previously.
Update Company Parameters
Update the AG_Configurations Company Parameter:
|
Agent Type |
Agent Name |
Config Name |
Config Value |
Config Attribute 1 |
|---|---|---|---|---|
|
|
|
|
|
|
For more information see Auto Create Actions on Resubmit.
(Optional) Configure Copilot
If you want to enable Copilot (AI Assistant) integration with Agents, create the required Advanced Configuration Options and configure the following settings:
-
enableCopilot -
enableDashboardAIAssistant
For more information see Copilot Activation and Configuration.
Copilot can create custom Agents even if the Sales Insights and Customer Insights are not deployed. However, if no specific Datamart is requested, the Agent Generator uses the Sales Insights/Customer Insights mapped Datamart by default. In current released versions, the generator does not always prioritize SIP field mappings consistently, which can lead to incorrect field selection or agent creation issues when mappings are missing, incomplete, or not suitable for the requested use case. If your partition does not have reliable Sales Insights/Customer Insights mappings, explicitly describe the required fields in the prompt and validate agent creation in QA. Pricefx is tracking this behavior and plans to improve it in a future Agent Generator release.
Review Business Role Assignments
The business role labels for the Actionable Insights Accelerator have been renamed to Agents for consistency. After upgrading, review all user role assignments and update them as follows:
|
Deprecated Role |
New Role |
|---|---|
|
[Actionable Insights] Watchers Analyst |
[Agents] Analyst |
|
[Actionable Insights] Watchers Contributor |
[Agents] Contributor |
|
[Actionable Insights] Watchers Manager |
[Agents] Manager |
Fetch the Updated Configuration
-
Open IntelliJ IDEA with the Pricefx Studio plugin installed.
-
Open the Fetch tool window.
-
Fetch the configuration changes described above into your project.
Commit Changes
Commit the updated configuration to the upgrade branch using a commit message similar to the following:
PFAGENTS-123 Manual post-upgrade configuration
Replace the ticket number as appropriate.
Reapply Project Customizations
If project customizations were identified during the prerequisite assessment, reapply them to the upgraded project before proceeding with testing.
The following workflow is recommended:
-
Check out the Git branch containing the project customizations identified in How to Detect Customizations.
-
Merge this branch with the upgrade branch that contains the latest Agents Accelerator upgrade.
-
Resolve any merge conflicts.
-
Verify that the merged branch includes the upgrade commits for all accelerator packages. The commit history should include entries similar to the following:
PFAGENTS-123 Upgrade to Agents Accelerator 1.6
PFAGENTS-123 Upgrade to Agents Accelerator Dashboards 1.6
PFAGENTS-123 Upgrade to Dashboard Library Accelerator 1.6.2
Replace the ticket number and versions as appropriate.
-
Test the merged project to verify that both the upgrade and the project customizations work as expected.
For guidance on validating the upgraded environment, see How to Verify Upgrade.
How to Verify Upgrade
After completing the upgrade and reapplying any project customizations, create a merge request for the upgrade branch.
Once the merge request has been approved and merged, wait for the deployment pipeline to promote the changes to the QA and PROD environments. Then validate the upgrade by performing smoke and regression testing in QA.
-
Start by running the same post-deployment tests that are performed after a new installation.
-
In addition, perform the following verification steps:
-
Verify that the Agent Assessment Overview and Action Review dashboards are available and display data correctly.
-
Verify that Copilot behaves as expected for the target release by following these guides:
-
If the QA validation is successful, repeat the required smoke and regression tests in the PROD environment.
Known Limitations and Risks
Keep the following considerations in mind when planning and performing an upgrade:
-
Agents Accelerator upgrades are not simple plug-in replacements. They modify an implemented customer solution and may require impact analysis, regression testing, and the reapplication of project-specific customizations.
-
Customizing the Agents Accelerator is not recommended. Projects that modify the standard accelerator code or structure carry additional technical and organizational risk during upgrades. Customizations must be carefully identified, reviewed, and validated after the upgrade.
-
Dashboard compatibility depends on the Pricefx core version. Due to packaging changes introduced between Agents Accelerator versions 1.2 and 1.2.3, the target partition must be running Pricefx 15 or later before the dashboard packages can be deployed successfully.
Rollback Guidance
Always create and verify backups before starting an upgrade.
PlatformManager does not support an undeploy operation. Rolling back an upgrade requires restoring the pre-upgrade project from Git and redeploying it to the target partition using Pricefx Studio or your standard CI/CD pipeline.
1. Stop the Rollout
If smoke tests fail or a critical issue is identified, stop the rollout immediately. Keep the upgrade branch intact for failure analysis.
2. Restore the Project from Git
Identify the rollback baseline:
-
Use the last backup commit created during Source Control and Backup Readiness, immediately before the first upgrade commit.
-
Create a dedicated rollback branch (for example,
pfxagents_rollback) from this baseline.
3. Redeploy the Previous Version
In Pricefx Studio:
-
Open the Deploy tool window.
-
Deploy each affected component to the target partition:
-
agents-accelerator -
agents-accelerator-dashboards -
dashboard-library-accelerator
-
-
Click Select all entities and their objects that exist in the selected directory (
-
Clear the Internationalization entity.
-
Click Deploy.
This process is similar to the fetch procedure described in the upgrade steps, except that the components are deployed from Git back to the partition instead of being fetched from it.
4. Remove Objects Introduced by the Upgrade
Redeploying an older version overwrites existing objects but does not remove objects introduced by the newer version.
Compare the upgrade branch with the rollback baseline and manually remove any objects that exist only in the upgraded version.
5. Restore Agents (If required)
If agents created or modified during the failed upgrade no longer function correctly:
-
Open the Agents page.
-
Click ⋯ > Import.
-
Import the backup
.zipfile created during Source Control and Backup Readiness.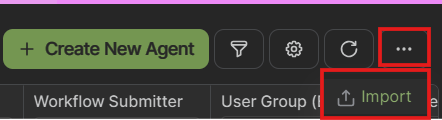
Agents page overflow menu (⋯) with the Import option visible.
If the existing agents continue to function correctly, this step can be skipped.
6. Restore Manual Configuration Changes
Reverse any manual configuration changes that were applied during the upgrade.
This includes:
-
Restoring the
deployedAcceleratorsCompany Parameter to the previous accelerator version by updating thetemplateVersionvalue.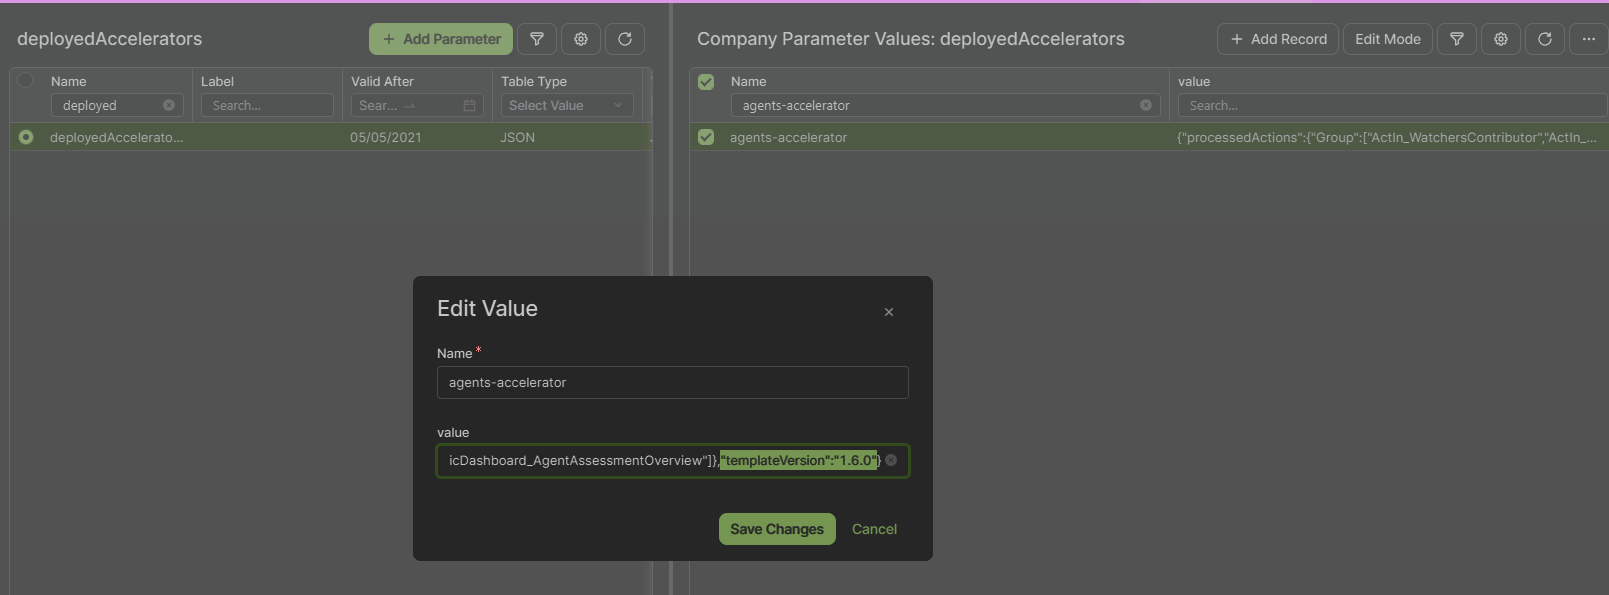
Company Parameter edit screen for deployedAccelerators, with the templateVersion field highlighted. -
Restoring the
AG_ConfigurationsCompany Parameter to its pre-upgrade state, or removing it if it did not exist before the upgrade. -
Reverting any Copilot configuration changes:
-
Remove
enableCopilotandenableDashboardAIAssistantif they were created during the upgrade. -
Otherwise, restore their previous values.
-
-
Reverting any additional partition-level changes, such as application preferences, permissions, or other manual configuration changes.
7. Restore Business Roles (Optional)
If the environment previously used the Actionable Insights Accelerator, restore the original business roles by:
-
Reassigning users from the [Agents] roles back to the corresponding [Actionable Insights] Watchers roles.
-
Removing the [Agents] roles if they were introduced solely by the failed upgrade.
8. Validate Rollback
Verify that the restored environment functions correctly by following the validation procedure described in How to Verify the Upgrade. Before attempting another production rollout, repeat the required validation in the QA environment.
Document the rollback procedure in the customer change plan before the upgrade window begins.
Responsibilities and Escalation
Customer Responsibilities
The customer is responsible for:
-
Providing a suitable QA or sandbox environment for upgrade validation.
-
Ensuring that the target environment and core business data are ready for the upgrade.
-
Providing visibility into any project-specific customizations or operational constraints.
-
Performing business acceptance testing after successful smoke and regression testing.
Partner Responsibilities
The implementation partner is responsible for:
-
Assessing the upgrade path and identifying all required manual upgrade steps.
-
Confirming the currently installed Agents Accelerator version.
-
Executing and validating the upgrade in a non-production environment before deploying to production.
-
Performing all required manual post-upgrade steps.
-
Reapplying and validating approved project-specific customizations.
-
Coordinating QA validation and the production rollout.
Pricefx Responsibilities and Escalation
For activation, implementation, and ongoing support, contact the Agents team at agentactivation@pricefx.com.
Escalate the upgrade to the appropriate Pricefx team if:
-
The correct upgrade path or compatibility requirements are unclear.
-
The customer solution contains non-standard customizations that may affect the upgrade.
-
Smoke or regression testing reveals functional issues after the upgrade.
-
Additional assistance is required to diagnose or resolve upgrade-related problems.