Overview
|
Aim of this article |
Pricefx provides a number of Accelerators covering a wide range of functionalities. When deploying a specific Accelerator/Package via PlatformManager you will be guided through various steps in which you provide all information needed to make the Accelerator work (such as data upload, Datamart fields mapping, dashboard selection, waterfall configuration, rounding rules configuration, dependency configuration). Some other information is added by the system (such as exchange rates, conversion factors). As a result, you get an initialized Pricefx partition with an initial set of e.g. dashboards or other functionalities. This article describes the general flow how to deploy an Accelerator/Package to a partition and also the most common specific steps used in the Accelerator deployment. Note that the steps can differ for each Accelerator. |
|---|---|
|
Related sections |
|
|
Required permissions |
|
Notes
-
One deployment at a time: Only one Accelerator deployment can run on a partition at any time. Start a new deployment only after the previous one finishes or is rolled back.
-
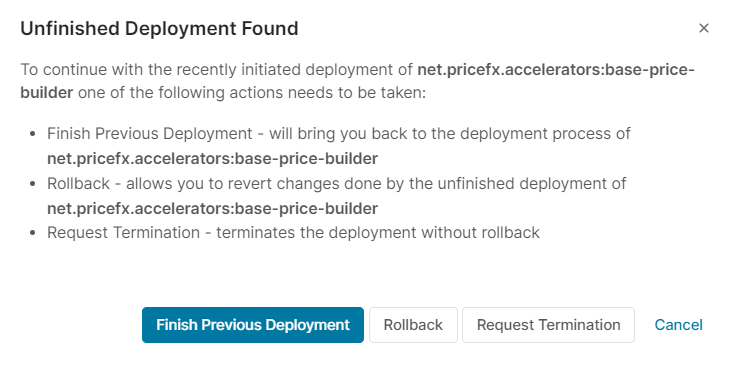
Unfinished deployments: If you cannot finish the Accelerator Package deployment, your progress is always saved. When you later trigger the deployment again, you are offered the following options:
-
Finish the previous deployment
-
Rollback (for this you need the Marketplace Templates - Deploy permission)
-
Request termination
-
Steps
1. Pre-Deployment Setup
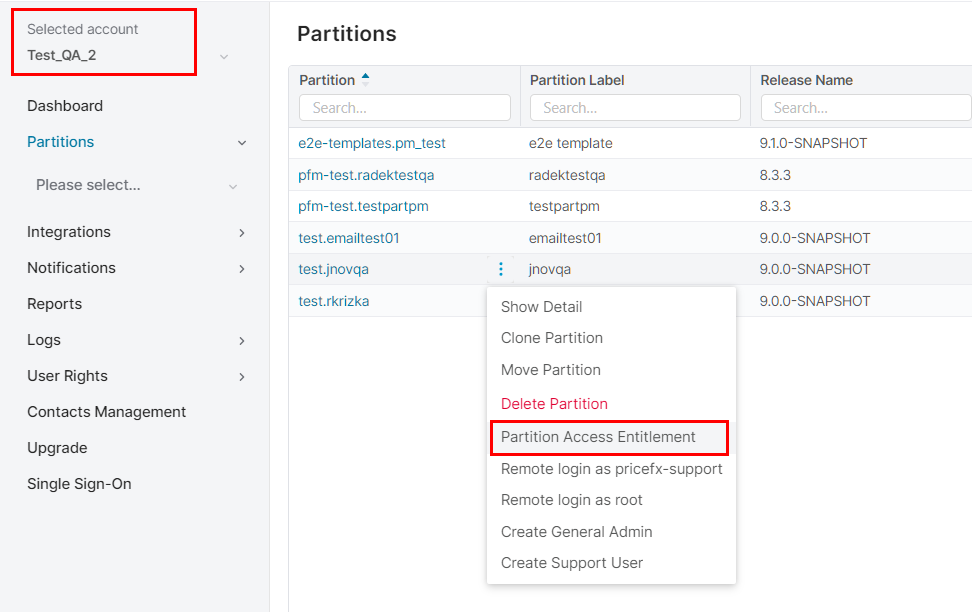
Make sure the correct account and partition are selected and you have defined a user who will connect to the partition (in Partition Access Entitlement).
2. Select and Configure Package
-
Go to PlatformManager at https://platform.pricefx.com/
-
In the Marketplace find the package you want to deploy and click its tile. At the detail screen, set the following:
-
Select the Target Partition where the package should be deployed.
-
Select Accelerator Version to deploy. The latest valid version is recommended.
-
(Optionally) Run Version Integrity Check to see whether the previous accelerator/package version at the partition was changed by anyone (e.g. the logic was modified). Then it is up to you whether to continue with the deployment and overwrite these changes or whether to cancel the deployment and verify and back up the changes first.
Example of a result: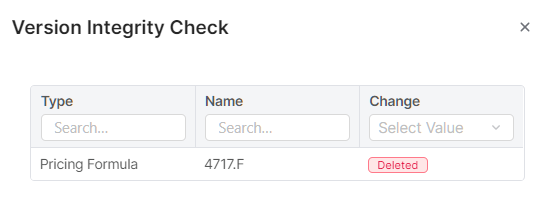
-
Click Deploy.

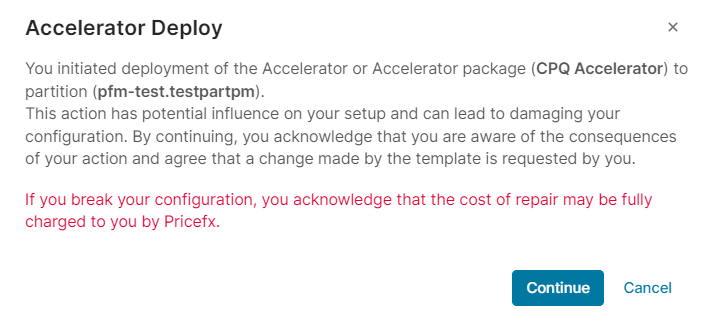
3. Review Warnings & Acknowledge Risks
There is a warning displayed that installing a new Accelerator may have a harmful impact on the selected partition. See the Accelerators documentation to understand which files and configuration will be deployed and thus overridden. Once you acknowledge the risks, you can proceed.
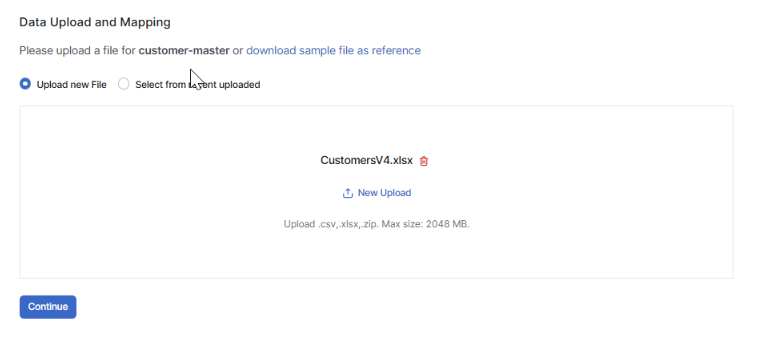
4. (If applicable) Data Upload
(This step is not common and is used here for the purpose of illustration.)
Some Accelerators start the deployment with uploading your data in the CSV format (zipped or unzipped). It could be, for example, customers, products, transactions, dependency configuration, product segmentation. For details of a specific Accelerator see the Accelerators documentation.
You can choose between two options:
-
Upload new File – upload a CSV, XLSX, or ZIP file.
If needed, you can download a sample file which will show you the expected file structure with mandatory fields.
-
Select from recent uploaded – reuse a previously uploaded file. A list of available files displays with the file Name and Upload date.
The preferred file encoding format is UTF-8. The maximum file size limit is 2048 MB.
Steps shown at top right can be different for each package.
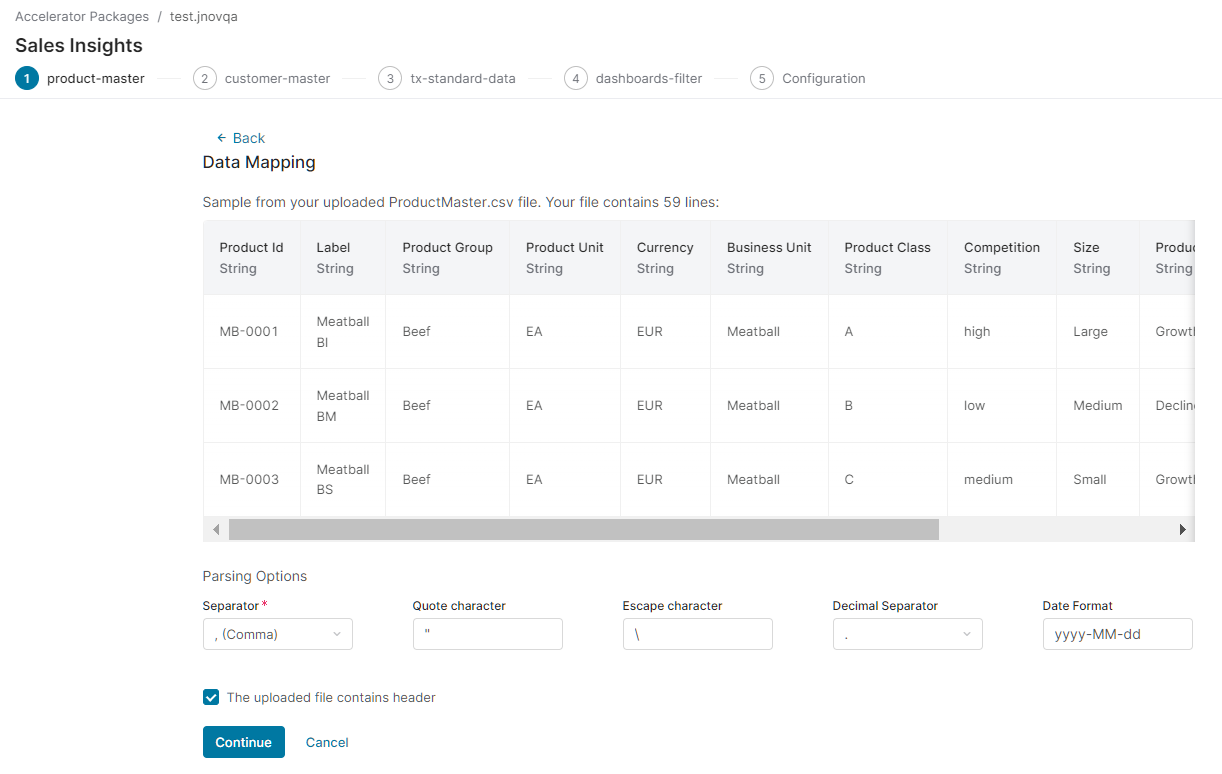
5. (If applicable) Configure Parsing Options
A sample from your data is displayed and you can specify the parsing options – what is used in your data file as a separator, quote and escape character, decimal separator and the date format. (The most common separators can be selected from a drop-down menu.)
You can also specify whether your CSV file has a header or not using the option Uploaded file contains header. If there is no header, generic header names “column1”, “column2”, etc. will be used.
The file is validated for correct types before the upload begins.
6. (If applicable) Data Mapping, Meta Descriptions and Field Data Types
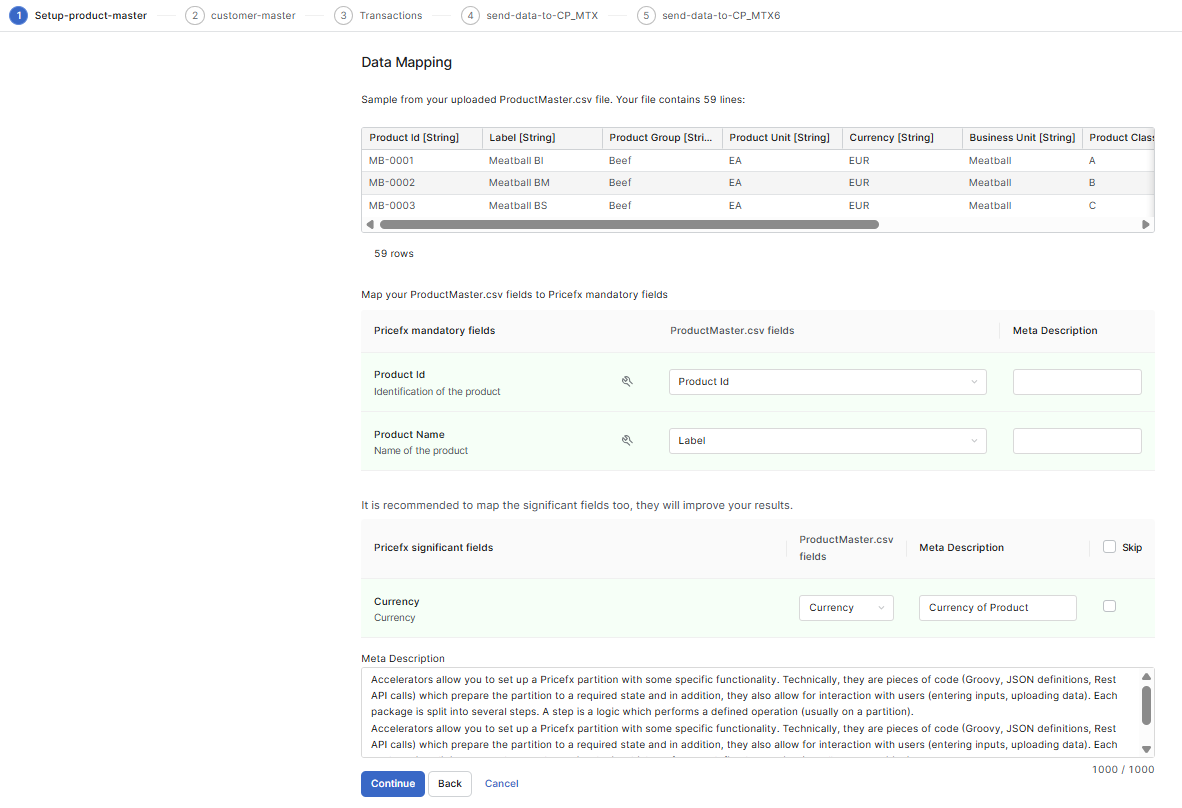
What follows with many Accelerators is to define Data Mapping – which fields from your CSV file correspond to the Pricefx mandatory fields.
Field Data Types are read directly from the Accelerator definition (steps.json). PlatformManager applies the correct converter automatically (e.g., INTEGER, MONEY, LONG). This ensures values are stored in the correct format and prevents deployment failures.
In the data sample table in the header row, you can see information on the data type which PlatformManager detected using the first 3 rows. In some cases there can be a warning icon and hints:
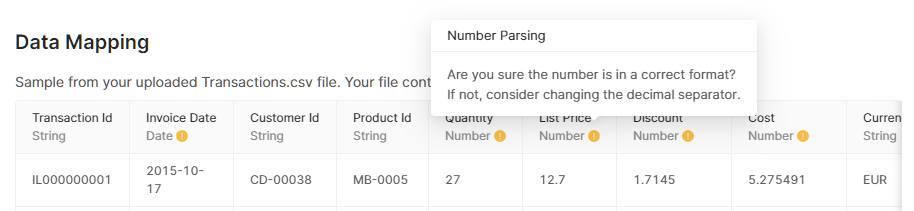
When uploading data during Accelerator deployment, the Data Mapping screen now shows a preview of both:
-
Original values from the uploaded CSV file (left column)
-
Converted values after applying the selected mapping rules or converters (right column)
This live preview helps you immediately detect if a converter has been wrongly applied (e.g., a number field converted to text, incorrect currency formatting, etc.).
Mandatory Fields Mapping
-
Map each required Pricefx field (e.g., Product Id, Product Name) to a field from your CSV file.
-
Generate mappings using AI (Optional):
-
Click Map fields with AI assistance.
-
Wait until the system finishes generating the mapping.
-
When the mapping applies, review the suggested mappings.
-
Note: If the AI service is unavailable, continue with manual mapping.
-
-
For every mapped field, you can enter a Meta Description - a free-text explanation (max. 1000 characters) describing the field's meaning, context, or business purpose.
📈 Including a meta description helps AI tools interpret your data more effectively, resulting in better outcomes and higher value for customers.-
Example: For “Price Volatility,” your description might be:
"Metric indicating how much the price changes seasonally. Range 0–100, where 0 means stable prices and 100 means prices always change."
-
Field Data Types and Converters
Field Data Types are read directly from the Accelerator definition (steps.json). PlatformManager applies the correct converter automatically (e.g., INTEGER, MONEY).
-
If the data type exists in the Accelerator: PlatformManager uses that type, and the data type cannot be changed on the UI.
-
If the data type does not exist in the Accelerator: PlatformManager uses the type recognized by IntegrationManager (IM). In this case, the data type can be set manually by the user.
-
If a field is detected as String, you cannot change it to Number.
-
In this step, you can also manipulate the data in various ways after you click the tools 
You can change the automatically applied converter in case it has been applied incorrectly.
This is done via the Advanced Field Editor, where you can select or replace a converter for any field and all data formats.
Pricefx significant fields
-
It's recommended to map significant fields such as Currency or UOM, and add a meta description where possible as it will improve your results.
Meta Description (for Entire Dataset)
-
At the bottom of the mapping screen, provide a Meta Description for the dataset as a whole. Use this field to explain the scope, content, or business intent of the entire uploaded file.
Including a meta description helps AI tools interpret your data more effectively, resulting in better outcomes and higher value for customers. -
Where the metadata is stored depends on the partition version. For partitions running 15.3.3 or later, dataset-level and field-level meta descriptions for Product, Customer, and Seller master data are stored in dedicated Master Data > Meta Data tables and are directly available to AI features such as Copilot.
The feature flag enableMasterDataMetadataUI must be enabled.
For older partitions, the metadata continues to be stored in Advanced Configuration Options to preserve backward compatibility.
Meta descriptions can be added for Product, Customer and Transaction steps. After the Accelerator is deployed, you can find these descriptions within the Advanced Configuration Options under METADATA_PRODUCT, METADATA_CUSTOMER and METADATA_TXStandardData options.
7. (If applicable) Data Validation
The Data Validation Tool is integrated into the Accelerator deployment process to ensure that uploaded data is validated before being sent to the partition. This improves data quality of given datasets.
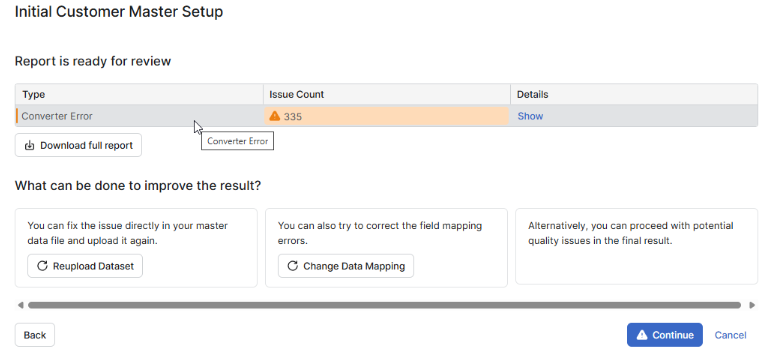
1. Review the Validation Report
After uploading your dataset and mapping fields, the system runs validation automatically. The Data Validation Tool also automatically verifies that all fields required by Pricefx Agents are present in the input file.
The Report shows:
-
Type of error (e.g., Converter Error, File Type Validation, null detected, Extended Validations).
-
Issue Count: Number of issues detected.
-
Details: Click Show to view more information about the errors (for example, if required fields for curated AI agents are missing, it will detail which fields you need to add, such as
Required fields are missing in the input file. Please add the following fields: Customer Segment, Customer ID, Customer Name).
You can also click Download full report to export all validation details.
Extended Validations cover field-level rules that the Accelerator declares for individual mapped fields. The Initial Standard Transaction Data Setup Accelerator declares one such rule: the column mapped to PricingDate must span at least 12 months between its earliest and latest value, because Pricefx Agents require at least one year of transactional data history to produce reliable results. If the spanned range is shorter, the Details list reports the field name and the actual span, for example Field 'PricingDate' - Date range must be at least 12 months, but was 11 months. The check is independent of the date format, columns formatted as yyyy-MM-dd, dd/MM/yyyy, or dd.MM.yyyy are all evaluated the same way.
2. Decide How to Handle Issues
If issues are found, you have three options:
-
Reupload Dataset
-
Fix the issues directly in your source data file (e.g., correct invalid values, remove duplicates, or add missing required fields for curated agents).
-
Upload the corrected file.
-
-
Change Data Mapping
If the problem is caused by incorrect field mapping, adjust the mapping and rerun validation.
-
Continue
Proceed with deployment even if issues remain.
A warning is displayed since this may impact data quality in the final result.
3. Rerun Data Validation
After correcting your file or mapping, click Rerun Data Validation. The system analyzes the updated data and refreshes the report.
4. Continue Deployment
Once your data is valid (or you decide to continue with warnings), click Continue. Deployment moves forward with your dataset.
If needed, you can return to this step later, your progress is saved.
8. (Optional) Additional Configuration
Depending on the Accelerator, the wizard may guide you through additional setup, including:
-
Mapping other optional fields: Which fields from your CSV file correspond to the Pricefx optional fields.
Adding Custom Fields
You can add your own custom fields to the target Data Source during the mapping step.
These custom fields are not persisted; when the Accelerator is used next time, these custom fields need to be defined again.
Create a custom field
-
In Map your fields to Pricefx optional fields, select Add custom field.
-
In Create New Custom Field, provide:
-
Label (required): The user-facing field label (can contain spaces).
-
Name (required): The technical field name.
-
It is prefilled from the Label by removing spaces (and any unsupported characters).
-
You can edit it, but it must follow the same naming rules as on the partition (for example, it must start with a letter and contain only supported characters; expected pattern like
[a-zA-Z]\w*). -
Example: Label =
Sales Manager> Name =SalesManager
-
-
Data type (required): Select the field type (Number, Quantity, Text, Date, Money, Currency, UOM, LOB, DateTime, Boolean, Integer).
-
Optional fields (if applicable): Measure (Per Unit, Extended, Fixed), Dimension (true for Text fields, false for Date fields), Function (Key).
-
-
Select Create.
Notes
-
In the target table (e.g., Data Sources > Data tab) the column is shown using the Label. The technical Name is visible (in a tooltip, shown in parentheses).
-
Currency Settings: Define base/reporting currencies.
-
Other configuration: Dashboard selection, dependency setup, product segmentation, simulation, rebate types, rounding rules, etc.
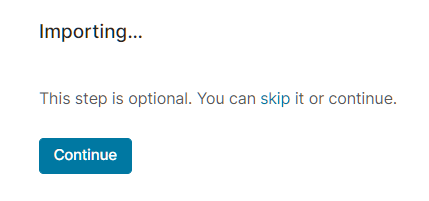
Some steps are optional and can be skipped using the wizard’s interface.

8. Complete Any Remaining Steps
Depending on the Accelerator, there can be other steps to go through. Just follow the deployment wizard.
Examples of such steps:
-
Data source mapping
-
Dashboard selection
-
Waterfall configuration
-
Dependency configuration
-
Product segmentation
-
Simulation setup
-
Rebate types selection
-
Rounding rules configuration
For details follow the links at the bottom of this page.
Some of the steps can be optional. You can skip them by clicking the link in the message. If you click Continue, you will proceed with the step.
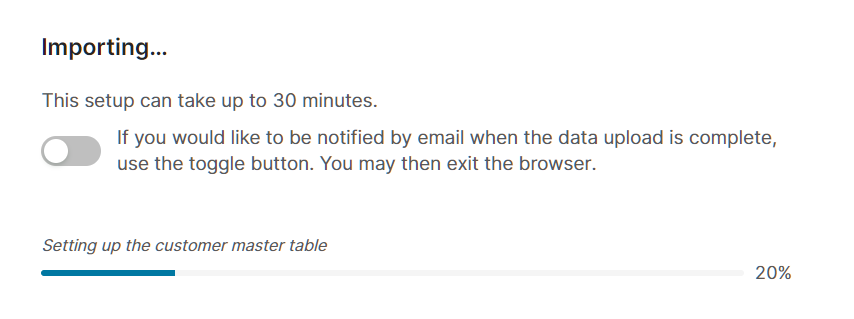
9. Deployment Progress
The deployment process will upload the content of the Accelerator and the data to the partition. The duration is different for each Accelerator. If it takes too long, you can choose to be notified by email about the completed upload, and once you enable this option, you can close the browser.
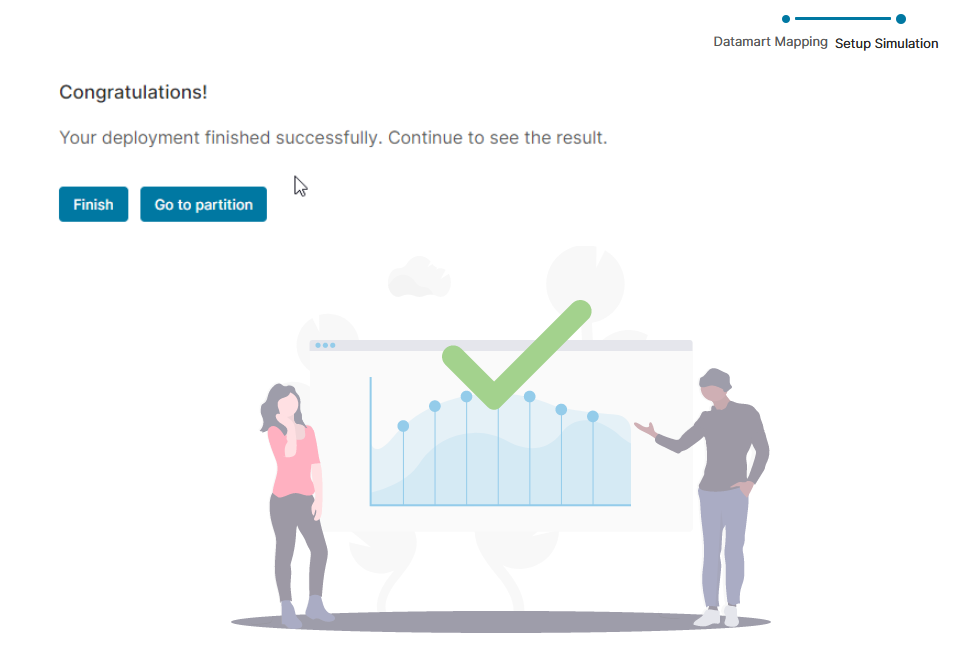
10. Finish & Access Your Partition
Once deployment completes, a confirmation screen is displayed with a link to your partition. Click the Go to partition button to access and begin using your newly initialized Pricefx partition.
For details on individual Accelerators see the Accelerators documentation: