Table of Contents:
Intro
With Pricefx AI Agents, you don’t just hear about AI-driven pricing – you experience it. In just a few steps, you can upload your data, deploy AI Agents, and instantly see how they generate actionable insights. This guided setup gives you a hands-on way to evaluate the power of AI in optimizing your pricing strategy.
Welcome Screen
After logging in with the credentials you received by email from Pricefx, you’ll land on the Pricefx AI Agents welcome screen.
Proceed as follows:
-
Review the consent statement about data processing.
-
Check the box: “I agree that all data uploaded may be processed in accordance with the Terms and Conditions and Privacy Policy.”
-
Click Get Started to continue.
Consent is required before AI Agents can be deployed.
Agents Creation – Setup Steps
The setup wizard will guide you through a simple process to prepare your Pricefx environment and deploy AI Agents.
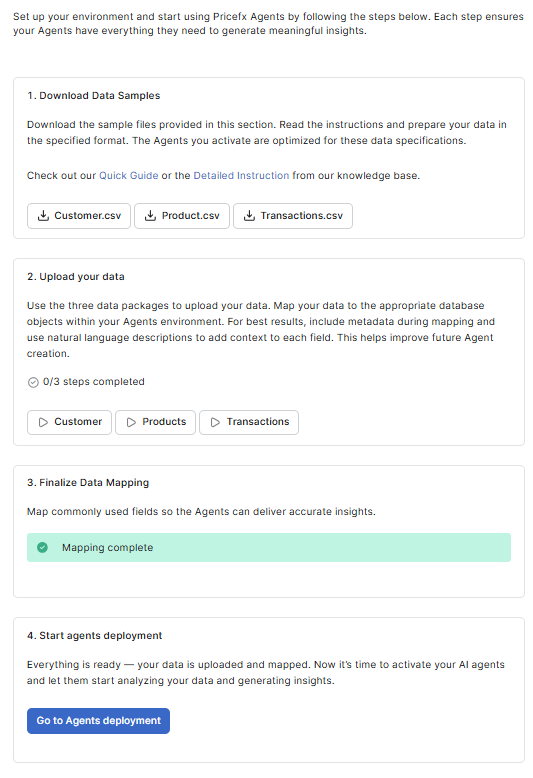
Step 1: Download Data Samples
Download example datasets to see the required structure for Customers, Products, and Transactions master data.
-
Customer_Sample.csv
-
Product_Sample.csv
-
Transactions_Sample.csv
Use these samples as templates to prepare your own files.
Step 2: Upload Your Data
Upload your datasets for Customers, Products, and Transactions.
Correctly structured data ensures smooth processing.
Step 3: Finish Data Mapping
Map your uploaded transaction data so that AI Agents can correctly interpret and analyze it. Accurate mapping ensures your insights reflect your business data.
This step installs the Sales Insights - Transaction Mapping Accelerator.
Step 4: Start Agents Deployment
Once all steps are complete, click Deploy Agents. A loading screen appears while the system prepares your environment. This action activates your AI Agents and deploys them to your Pricefx partition, where they begin processing your data and generating actionable insights.
Your agents have been successfully generated and deployed to the partition!
Action generation starts immediately after deployment completes, no manual trigger is required.
Automatic Action Generation
After the Agents are deployed, the system automatically triggers action generation for each Agent based on its configured Detection Rules. The detection schedule is set automatically by the agent generator, so no manual scheduling is required for the first action run.
Once action generation completes, the result is displayed in the Agents Creation panel:
-
Success: successfully deployed Agents are listed with their generated actions in the partition. The Move to partition button becomes active.
-
Partial failure: any Agents whose action generation did not complete are identified in the Warning banner. The deployed Agents themselves remain available; only their action generation needs to be retried.
-
Timeout: if an Agent's action creation does not finish within the allowed window, the Warning banner lists the timed-out Agents. Re-trigger deployment to retry.
For step-by-step instructions on reviewing the generated actions of a deployed Agent, see How to Review Deployed Agents .
Accessing the Partition
After the first run of the agents generation, the Go to partition button is always visible and active. You can access the partition to fix potential issues with agents that cannot be resolved by uploading new data.
-
Click Go to partition (in the top-right corner) to access your Pricefx partition.
-
If needed, click Reconfigure to adjust settings.
Generating API Key
After deploying the Agents, you need to generate an API key for your new partition. This key is essential for integrating your Salesforce setup with the Pricefx partition.
-
Click the Generate API Key button in the top-right corner.
-
A modal will appear displaying your new API key. Note that this key is not saved anywhere, so make sure to copy it securely.
-
Add this API key in your Salesforce setup to enable communication with the Pricefx partition.
Note: Each time you generate a new API key, the previous one is invalidated. Ensure you update your Salesforce configuration with the new key.
Handling Deployment Errors
If the deployment process encounters issues, the system provides detailed feedback to help you resolve them:
-
Error List: The UI displays a Warning banner listing the specific agents that failed to generate, including the error message for each.
-
Re-trigger Generation: You can attempt to fix the underlying data or mapping issues and then re-trigger the deployment.
-
Reconfigure: If the failure is due to incorrect mapping, click Reconfigure to return to the Finalize Data Mapping step. After adjusting the mapping, click Go to Agents deployment to try again.
-
Action-Generation Failures: If an Agent deploys successfully but its action generation does not complete (for example, because of a calculation timeout or a data issue), the Warning banner identifies which Agents are affected. The deployed Agents themselves remain available, retry the action generation by re-triggering deployment, or, if the failure is data-related, click Reconfigure to revise the mapping.
When you redeploy the Agents after reconfiguring your data, the system checks whether a partition user already exists for your account. If the user already exists, the system redeploys the Agents without changing your partition password and does not send a new credentials email. Your existing credentials remain valid. A new credentials email is sent only the first time the partition user is created.
Even if agent generation fails, your partition credentials remain valid, allowing you to log in and investigate the partition state directly.
What’s Next?
Start reviewing your deployed Agent in the partition to confirm that the configuration meets your requirements. For instructions see How to Review Deployed Agents.