
Manage Workflows
In Pricefx, Workflow Designer lets you manage the full lifecycle of a workflow. From initial draft through publishing, versioning, activation, and deactivation. This article covers all workflow lifecycle management tasks. It does not cover the visual canvas design experience.
Navigation: Administration > Workflow Designer
Prerequisites
-
You have the Manage Workflow Designer role assigned (required for the create, publish, activate, and deactivate actions described here). See Workflow Designer Permissions.
-
Workflow Designer is installed and enabled on your partition.
View and Filter the Workflow List
The workflow list displays all workflows available in your partition. Use filters to locate specific workflows by status, name, or other attributes.
-
Go to Workflow Designer.
-
The workflow list opens and displays all existing workflows.
-
Use the filter controls at the top of the list to narrow results.
-
Click a workflow name to open it.
Note: Published workflows open in read-only mode. To make changes, create a next version from the published workflow. See Create Next Version from Published Workflow.
Expected result: The workflow list displays only the workflows that match your filter criteria.
Edit Workflow Details
You can edit the details of a workflow that is in Draft status.
Prerequisites: The workflow must have Draft status.
-
Go to Workflow Designer.
-
Locate the workflow in the list and click its name to open it.
-
Click the edit icon (pencil) next to the workflow name in the top-left area of the designer canvas.
-
The edit icon opens a Rename dialog. Only the workflow name/label is editable from this control. All other workflow content is edited on the canvas.
-
Save your changes. The status indicator in the top bar shows Draft | Saved.
Expected result: The workflow details are updated and saved. The workflow remains in Draft status.
Tip: To edit the workflow content on the canvas, such as nodes and connections, see Edit Workflows on the Canvas.
Duplicate Workflow as New Draft
Duplicating a workflow creates a new independent draft that is a copy of the selected workflow. Use this task to reuse an existing workflow structure without modifying the original.
-
Go to Workflow Designer.
-
Locate the workflow you want to duplicate.
-
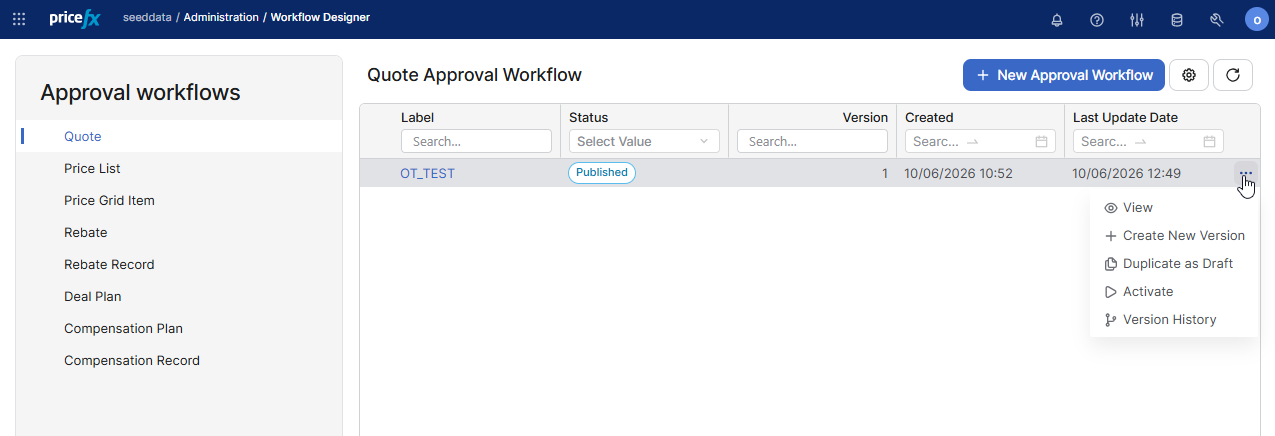
Open the workflow's action menu (⋯).
-
Select Duplicate (for Draft workflows) or Duplicate as Draft (for Published or Superseded workflows).
-
Confirm by clicking Duplicate in the confirmation dialog.
Expected result: A new workflow named "Copy of {original name}" appears in the list in Draft status.
Export Workflow Definitions
Exporting saves workflow definitions as JSON. Use an export to move workflows from one partition to another, for example from a test partition to a production partition.
You can export a single workflow, or every workflow in the selected workflow type.
Prerequisites: You have access to Workflow Designer.
Export a Single Workflow
-
Go to Workflow Designer.
-
Locate the workflow in the list.
-
Open the workflow’s action menu (⋯) and select Export. You can also select Export from the action menu on the workflow canvas.
-
The Export dialog opens on the Selected Workflow tab and shows the workflow definition as JSON.
-
Click Download to save the definition as a file. Click Copy to clipboard to copy the JSON instead.
-
Click Close.
Expected result: The workflow definition is saved to a file, or copied to your clipboard.
Export All Workflows in a Workflow Type
-
Go to Workflow Designer.
-
In the left panel, select the workflow type you want to export.
-
Open the more actions menu (⋯) above the workflow list, then select Export.
-
The Export dialog opens with up to two tabs:
-
All Latest opens first, already selected. It contains every draft, plus each published workflow that has no draft of the same name. It never contains superseded workflows.
-
All Published appears after All Latest, and only when the workflow type contains at least one published workflow. It contains every published workflow, including the version marked Active.
-
-
Select a tab to preview the JSON for that set.
-
Click Download or Copy to clipboard, then click Close.
Expected result: The definitions for the selected set are saved to a file, or copied to your clipboard.
Note: The Export option appears only when the selected workflow type contains at least one workflow to export.
Note: An active workflow is a published workflow that you have activated. Both appear in All Published.
Import Workflow Definitions
Importing adds workflow definitions from a previous export. Import the definitions into the same workflow type that you exported them from.
Prerequisites:
-
You have the Manage Workflow Designer role assigned.
-
You have a JSON definition from a previous export.
-
Go to Workflow Designer.
-
In the left panel, select the workflow type you want to import into.
-
Open the more actions menu (⋯) above the workflow list, then select Import.
-
In the JSON field, paste the exported JSON. To load it from a saved file instead, click Upload.
-
Click Import.
Expected result: Each imported workflow appears in the workflow list in Draft status.
Note: Every imported workflow arrives in Draft status. The status it held at export does not carry over.
Note: If the workflow name is already used in the target workflow type, Pricefx adds a number to the imported workflow’s name.
Warning: Import only into the workflow type that you exported from. If the file contains a workflow from a different workflow type, Pricefx rejects the whole import and imports nothing.
Resolve an Import Conflict
If an imported workflow has the same content as an existing workflow, the Import Conflict dialog opens. You resolve one conflict at a time.
For each conflict, choose one option:
|
Option |
Result |
|---|---|
|
Import Duplicate |
Pricefx imports the workflow alongside the existing one, and keeps both. |
|
Don’t import |
Pricefx skips the workflow and keeps the existing one. |
To apply your choice to every remaining conflict, select Do this for all conflicts before you choose an option.
When more than one conflict exists, the dialog title shows a counter, for example Import Conflict (2/4). A single conflict shows no counter.
Expected result: After you resolve the last conflict, the dialog closes and the import finishes. Workflow Designer stays on the workflow list, and does not open a workflow.
Publish Workflow
Publishing a workflow makes it available for use. A published workflow is read-only. To modify a published workflow, you must create a next version.
Prerequisites:
-
The workflow must have Draft status.
-
The workflow must be valid. The status bar must show Valid before the Publish button becomes active. The screenshot shows the Publish button in the top-right corner of the designer canvas, active when the workflow status is Draft | Saved | Valid.
-
Go to Workflow Designer.
-
Open the draft workflow you want to publish.
-
Verify that the status bar shows Draft | Saved and the Valid badge is displayed.
-
Click Publish in the top-right corner.
-
In the Publish workflow dialog, enter a reason in the Reason for Publication field. Optionally check Activate this workflow immediately, then click Publish or Publish & Activate.
Expected result: The workflow status changes to Published. The workflow is now available for use and opens in read-only mode.
Warning: Publishing a workflow is irreversible. You cannot revert a published workflow to draft status. To make further changes, create a next version.
View Published Workflow Without Editing
Published workflows are read-only. You can open and inspect a published workflow, but you cannot modify it directly.
-
Go to Workflow Designer.
-
Locate the published workflow in the list and click its name.
-
The workflow canvas opens in read-only mode. All nodes, connections, and node properties are visible but not editable.
Tip: To modify a published workflow, create a next version. See Create Next Version from Published Workflow.
Expected result: The published workflow displays on the canvas in read-only mode. No editing controls are active.
Create Next Version from Published Workflow
Creating a next version generates a new draft based on a published workflow. This lets you modify the workflow while keeping the published version available.
Prerequisites: The workflow must have Published status.
-
Go to Workflow Designer.
-
Locate the published workflow in the list and click its name to open it.
-
Select Create New Version from the workflow's action menu (⋯).
-
Confirm the action.
Expected result: A new workflow draft appears in the workflow list. The draft is a copy of the published workflow and is ready for editing. The published version remains unchanged and available.
Mark Workflow as Active
Activating a workflow assigns it to the Workflow Accelerator's Company Parameters tables. Only one version of a workflow can be active at a time.
Prerequisites: The workflow must have Published status.
-
Go to Workflow Designer.
-
Locate the published workflow in the list, or open it on the canvas.
-
Select Activate from the workflow's action menu (⋯) in the list, or click the Activate button in the canvas header.
-
In the Activate The Workflow confirmation dialog, confirm the action.
Expected result: The workflow status updates to Active.
Note: Activating a workflow means it is active in the Company Parameters tables. If another workflow version was previously active, it is replaced and moves to Superseded status.
Deactivate Workflow
Deactivating a workflow removes it from the Company Parameters tables by clicking Deactivate. The workflow record is retained but is no longer active.
Prerequisites: The workflow must currently be marked as Active.
-
Go to Workflow Designer.
-
Locate the active workflow in the list.
-
Open the workflow actions menu (⋯) for that workflow, or open it on the canvas.
-
Click Deactivate and confirm the action.
Expected result: The workflow is removed from the Company Parameters tables. The workflow record remains in the workflow list but is no longer active. Verify the impact before deactivating.
Reactivate Workflow
Reactivating re-writes the workflow to the Company Parameters tables without changing its status.
Prerequisites: The workflow must currently be Active.
-
Go to Workflow Designer.
-
Locate the active workflow in the list.
-
Open the workflow's action menu (⋯).
-
Select Reactivate and confirm the action.
Expected result: The message "Workflow is active again." is displayed.
Workflow Status Reference
The following table describes the workflow statuses used in Workflow Designer.
|
Status |
Description |
|---|---|
|
Draft |
The workflow is being created or edited. It is not yet available for use. Imported workflows always arrive in this status. |
|
Published |
The workflow is finalized and available for use. It is read-only and can be activated. |
|
Active |
A published workflow that is currently assigned and applied in the Company Parameters tables. Only one version per object type can be Active at a time. |
|
Superseded |
A previous version that has been replaced by a newer activated version. It is read-only and remains visible in the list for reference and audit. |