
This tutorial walks you through creating and publishing your first workflow in Pricefx Workflow Designer. By the end, you will know how to open Workflow Designer, build a simple workflow on the canvas, configure a node in the side panel, validate the workflow, and publish it.
This tutorial does not cover versioning, deactivation, or other advanced lifecycle management topics.
Navigation: Administration > Workflow Designer
Goal
After completing this tutorial, you will be able to:
-
Open Workflow Designer.
-
Create a new workflow from scratch.
-
Add and connect nodes on the canvas.
-
Configure a node.
-
Validate and publish the workflow.
Prerequisites
-
You have a Pricefx user account with permission to access and create workflows.
-
Workflow Designer enabled in your partition.
-
The Workflow Approval Accelerator is deployed on your partition (required for Workflow Designer to load). If you see a Workflow Accelerator Not Deployed screen, contact your administrator.
Step 1: Open Workflow Designer
Workflow Designer is accessible from the Pricefx main menu.
-
Log in to your Pricefx partition.
-
In the top-right corner, click Administration and open Workflow Designer.
The Workflow Designer list view opens, showing any existing workflows.
Step 2: Create a New Workflow
You can create a workflow from scratch using the Workflow Designer canvas editor.
-
In the Workflow Designer list view in the left panel, select the entity you want to use the approval workflow for.
-
Click +New Approval Workflow
-
Enter a label for the workflow and click Create to confirm.
The canvas editor opens. The workflow is saved automatically and displays a Draft | Saved status indicator at the top of the screen.
Step 3: Understand the Canvas Interface
The Workflow Designer canvas interface has three main areas:
-
Building blocks panel (left): Contains draggable node types organized into two groups:
-
Actions: Includes nodes such as Send notification and Request approval.
-
Controls: Includes nodes such as Finish workflow and Condition.
-
-
Canvas (center): The visual editing area where you arrange and connect nodes. Use the toolbar buttons (+, −, fit-to-screen, and Arrange) to zoom and auto-position nodes.
-
Node Properties panel (right): Displays configuration fields for the selected node.
The canvas always starts with a Start workflow node already placed.
Step 4: Add Nodes to the Canvas
You build a workflow by adding a node after an existing one. The quickest way is the + button attached to a node, which adds the next step and connects it automatically.
-
On the Start workflow node, click the + below it. An Add workflow step menu opens, listing the available node types: Condition, Send notification, Request approval, and (once at least one step exists) Finish workflow.
-
Select Condition. The node is added below Start workflow and connected automatically. A Condition node creates two branch outputs, TRUE and FALSE, each with its own + button.
-
On the TRUE branch +, add a Request approval node.
-
On the FALSE branch +, add a Send notification node.
-
Click the + below the Request approval node and add a Finish workflow node. Repeat for the Send notification node so that each branch ends in a Finish workflow node.
You now have a branching workflow built from these nodes: Start workflow, Condition, Request approval, Send notification, and a Finish workflow node on each branch.
Tip: You can also drag node types from the Building blocks panel onto the canvas. Nodes added with the + button are connected automatically; nodes you drag on must be connected manually (see Step 5). Click Arrange in the canvas toolbar at any time to reposition nodes into a clean layout.
To select, copy, duplicate, or delete nodes on the canvas, see Edit Workflows on the Canvas.
Step 5: Connect the Nodes (if needed)
If you added every node with the + button as described in Step 4, the nodes are already connected — skip to Step 6. Follow the steps below only to connect nodes you dragged onto the canvas from the Building blocks panel.
Connections define the order in which the workflow executes. You create a connection by drawing an edge from one node's output handle to another node's input handle.
-
Hover over the Start workflow node's output handle until your mouse cursor changes to a cross.
-
Click and drag from the Start workflow handle to the top of the Condition node. Release to create the connection.
-
Connect the TRUE output of the Condition node to the Request approval node.
-
Connect the FALSE output of the Condition node to the Send notification node.
-
Connect the bottom of the Request approval node to a Finish workflow node.
-
Connect the bottom of the Send notification node to a Finish workflow node.
The canvas now shows a branching flow: Start workflow → Condition → Request approval or Send notification → Finish workflow.
Note: The Condition node produces two labeled outputs: TRUE and FALSE. Each output must be connected to a downstream node for the workflow to be valid.
To move an existing connection to another node, or to delete a connection, see Edit Workflows on the Canvas.
Step 6: Configure a Node in the Node Properties Panel
Each node has configurable properties. This step shows you how to configure the Request approval node.
-
In the Node label field, enter a descriptive label, for example Sales manager approval.
-
In the Min. number of approvers field, confirm or change the value. The default is 1.
-
In the Reason field, enter the reason for the approval step.
-
In the Approver category field, select User, User Group or Business Role.
-
In the Approvers field, search for and select the approver for this step.
-
To add another approver, click + Add and repeat the search.
Note: When the Approver category is User, list at least as many approvers as the Min. number of approvers value. Otherwise the workflow is invalid, and you cannot publish it.
List each approver only once. A duplicate approver also makes the workflow invalid.
Step 7: Configure the Condition Node
The Condition node routes the workflow based on a logical expression.
-
Click the Condition node on the canvas to select it.
-
In the Node Properties panel, locate the Condition field.
-
Enter a logical expression that evaluates to true or false. For example:
header.margin < 0.25
For more details about expressions, see Condition Expressions (Approval Workflow).
Step 8: Validate the Workflow
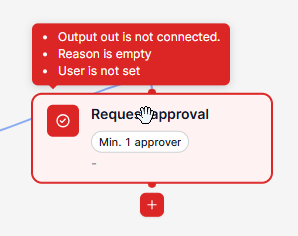
Workflow Designer validates your workflow in real time. The validation status is displayed at the top of the screen, next to the workflow name.
-
Valid (shown in green): All nodes are correctly connected and configured. The workflow is ready to publish.
-
Draft | Saved with an Invalid badge: One or more nodes have missing or incorrect configuration.
To check validation status:
-
Review the status indicator at the top of the screen. The status reads Draft | Saved and shows a green Valid badge.
-
If the workflow is not valid, hover over or click each node and review the Node Properties panel for missing required fields. Required fields are marked with a red asterisk (*).
-
Correct any errors until the Valid indicator appears.
Step 9: Publish the Workflow
Publishing moves the workflow from Draft to Published state. To make it active immediately, check the Activate this workflow immediately option in the Publish dialog.
-
Confirm that the status indicator shows Valid.
-
Click Publish in the top-right corner. The Publish workflow dialog opens.
-
In the Reason for Publication field, enter a reason.
-
To activate the workflow immediately, check Activate this workflow immediately.
-
Click Publish & Activate (if the checkbox is checked) or Publish (to publish only).
If you clicked Publish & Activate, the workflow is now active. If you clicked Publish, the workflow is in Published state and can be activated separately.
You are now ready to explore more advanced workflow configurations, including additional node types, versioning, and deactivation.