Calculation Dimensions should be added at the beginning of the project, since they influence majority of Accelerator functionality. The steps to add a new Calculation Dimension are as follows:
-
Add the dimension to Accelerator Advanced Configurations
-
Add the Calculation Dimension Calculation Parameter to Formula Designer
-
Create new Condition Records Set matching the new structure and modify the Condition Record creation
-
Add the Calculation Dimension details into the configuration Company Parameter
-
Create a Calculation Dimension function
Step 1. Add the dimension to Accelerator Advanced Configurations
Go to Administration → Configuration → Advanced Configuration Options and find these three Advanced Configuration entries:
-
AGR_CostForecast_AdvancedConfiguration
-
AGR_Historical_AdvancedConfiguration
-
AGR_VolumeForecast_AdvancedConfiguration
Each of these contains a key entry “calculationDimensions”, which expects a Calculation Parameter to Field mapping. So for example, if you want to add a Customer ID as a new Calculation Dimensions, you’ll need to find under which column is Customer ID stored in each of these three entities (Cost PX, Volume PX and Historical Data DM). After you have the field, you’ll need to define the Calculation Parameter name, usually we’d recommend having it in form of “upper case joined with underscore”, for example Customer Id would be CUSTOMER_ID.
So for the Customer ID example, the calculationDimensions entry could look like this:
"calculationDimensions": {
  "SKU": "sku",
  "CUSTOMER_ID": "customerId"
},
Step 2. Add the Calculation Dimension Calculation Parameter to Formula Designer
Go to Administration → Configuration → Advanced Configuration Options and find an entry called formulaDesigner. In that entry under the additionalParameters key you should add your new Dimension so it will be available as a Calculation Parameter in the Formula Designer. It’s best to follow the structure defined by the Accelerator, so in our Customer ID example the additionalParameters will look like this:
"additionalParameters": {
   "CUSTOMER_ID": {
    "label": "Customer ID",
     "type": "string"
   },
  "SKU": {
     "label": "Product ID",
     "type": "string"
   }
}
Step 3. Create new Condition Records Set matching the new structure and modify the Condition Record creation
Go to Administration > Configuration > Condition Record Sets (Master Data section) > AGR_DefaultCondition_Record_Set and modify any columns/attributes to fit your dimensions and calculation outputs. The document on how to create/modify Condition Record sets can be found here.
Example: If currently SKU is on key4 and the needs are to add two new dimensions Customer ID and Region, then depending on their hierarchy (let’s assume Region → Customer ID → SKU), they should be added respectively as key4 (Region), key5 (Customer ID) and key6 (SKU), with all other keys moved appropriately if necessary.
You can also create new Condition Record set instead, but remember to change the CONDITION_RECORD_SET_NAME value to the name of the new set in the library AGR_ProcessingLib element ConstConfig. The new set must have the same keys as the AGR_DefaultCondition_Record_Set.
Whether you’ve created a new set or modified the existing one, you’ll also need to change the CONDITION_RECORD_CONFIG entry in the library AGR_ProcessingLib element ConstConfig. Make sure that entries reflecting keys/attributes from your condition record set are setup here. Keys for calculation dimensions are resolved automatically in logic AGR_FormulaBasedPricing element ConditionRecords, so skip them.
Step 4. Add the Calculation Dimension details into the configuration Company Parameter
Go to Company Parameters > AGR_CalculationDimensions and add a new entry for each of your Calculation dimensions. The columns are as follows:
-
Calculation Parameter - name of the Calculation Parameter that matches the ones added in the Advanced Configuration in the Step 1. More on Calculation Parameters can be found here. For our Customer ID example this entry would be populated with CUSTOMER_ID.
-
Dimension Label - in certain places it is necessary to display the Calculation Dimension label to the user, for example in the Calculation Result Matrices present on Line Item Results. This is the place to provide user-friendly value for such dimension. For our Customer ID example this entry would be populated with Customer Id.
-
Function Path - Dimension values have to be retrieved in some manner, for example based on input values or other parameters. This column holds a path to a library called AGR_CalculationDimensionsLib, which stores functions that retrieve those values. For our Customer ID example this entry would be populated with libs.AGR_CalculationDimensionsLib.CUSTOMER_ID.getCustomerIds (notice no parenthesis at the end).
-
Execution Order - Dimensions have a hierarchy, this hierarchy has to be setup here in order to know which dimension is higher up the hierarchy (the lower the number the higher up the hierarchy given dimension is, it means the function for retrieval of its values is executed before others). For our Customer ID example this entry would be populated with 1 (since Customer ID is higher up the hierarchy) and SKU (the one shipped with Accelerator) should be changed to 2.
-
Condition Record Key - In Step 2. we’ve created a Condition Record Set to match the new structure, here we should pass the key number under which the dimension should be stored in said set. For our Customer ID example this entry would be populated with key4 and SKU (the one shipped with Accelerator) with key5.
Step 5. Create a Calculation Dimension function
Navigate to AGR_CalculationDimensionsLib. We recommend to add a new element to this library for each new Calculation Dimension. In that element you’ll be creating a function that will give the dimension values based on your needs. It can come from various sources - you can define a static list of values, you can make it configurable via some Company Parameter or you can make it dependent on an input, in which case you may need to add the input as well ( How to Modify, Add and Remove Inputs).
The function has to have the following definition:
Map getMyDimension(Map calculationParameters, Map dimensionTree) {
  <content here>
}
It has to return a Map, because we will be building a dependency tree (more on that later). It has to have two parameters:
-
calculationParameters - this is a Map containing all calculation parameters that are available in the current line item. What exactly is stored in this map can be found here.
-
dimensionTree - this is the previous tree iteration, if we’re implementing more than one dimension, each dimension will extend this structure by additional level, depending on the needs. More on that later.
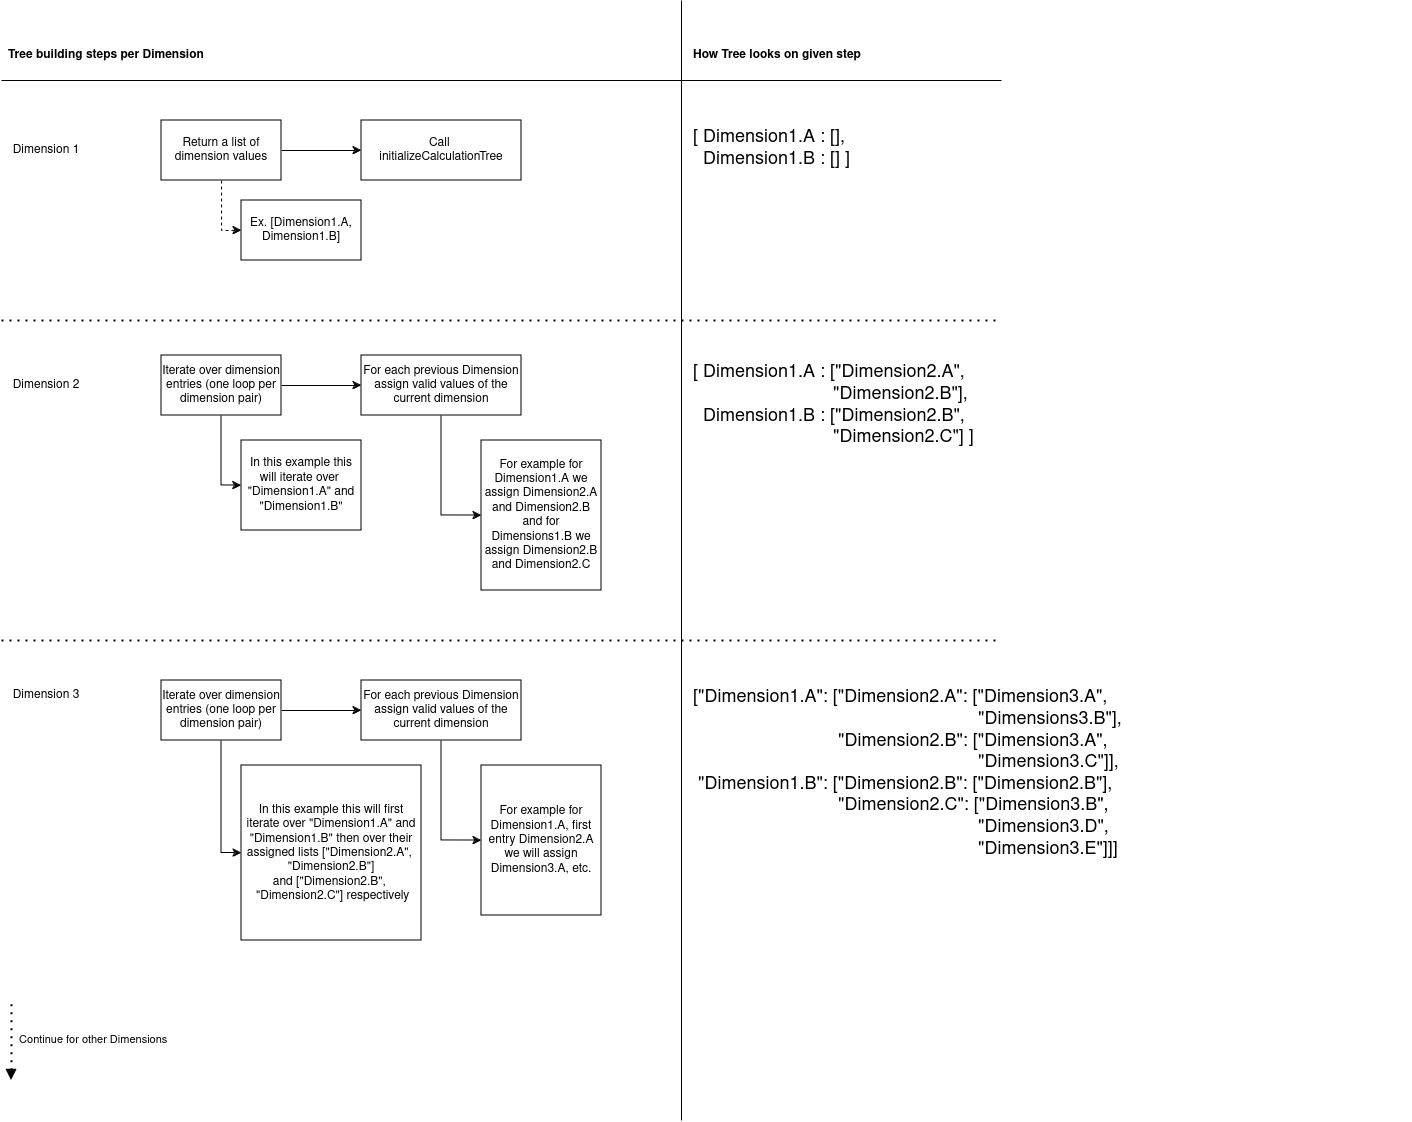
The tree building is a process that has to happen in defined order, some dimensions will depend on others. An example tree can look like this:
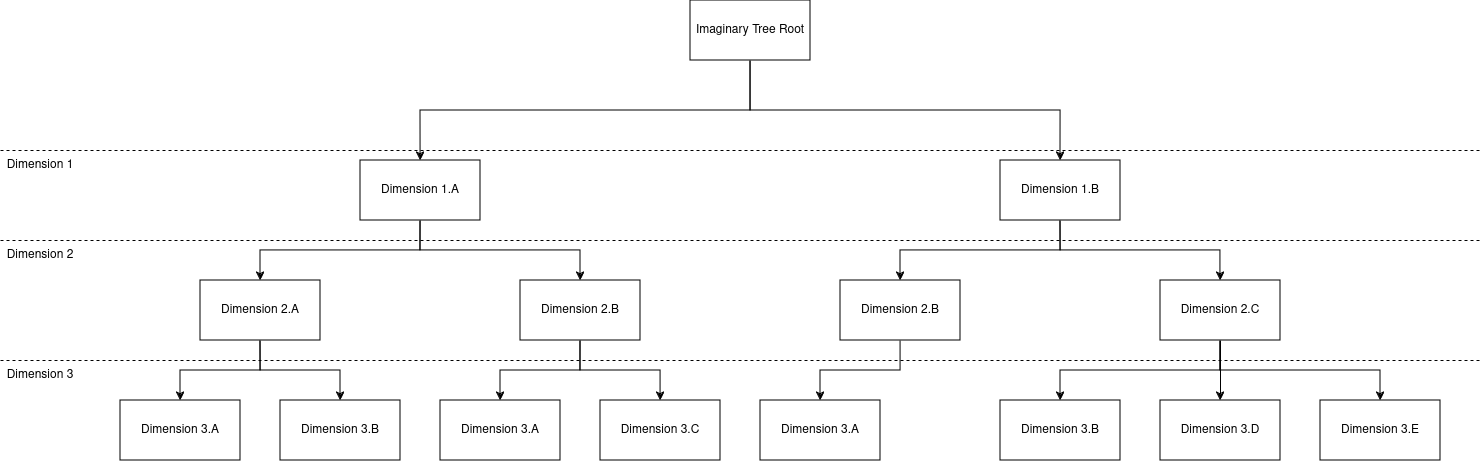
We’ll use it as an example for other operations. For each of the dimensions a new function has to be written to retrieve the valid dimension values. So for the example above there would have to be 3 functions:
-
getDimension1
-
getDimension2
-
getDimension3
They should follow this flow:
Going dimension by dimension the functions could look something like this;
Dimension1:
Map getDimension1(Map calculationParameters, Map dimensionTree) {
    //Retrieve the values of the dimensions, they could be hardcodded or retrieved from a calculation parameter,
    //from some lookup or in a totally different way.
    List dimensions1 = ["Dimension1.A", "Dimension1.B"]

    //Here we initialize the tree, the dimensionTree variable in the first dimension serves no purpose.
    return libs.AGR_ProcessingLib.CalculationDimensionUtils.initializeCalculationTree(dimensions1)
}
Dimension2:
Map getDimension2(Map calculationParameters, Map dimensionTree) {
    return dimensionTree.collectEntries { String dimension1, List dimension2Values ->
        //Of course the method for assigning dimension to dimension probably will be more sophisticated,
        //but this is just an example.
        if (dimension1 == "Dimension1.A") {
            return [(dimension1): ["Dimension2.A", "Dimension2.B"]]
        } else {
            return [(dimension1): ["Dimension2.B", "Dimension2.C"]]
        }
    }
}
Dimension3:
Map getDimension3(Map calculationParameters, Map dimensionTree) {
    return dimensionTree.collectEntries { String dimension1, List dimension2Values ->
        Map dimension2WithDimension3 = dimension2Values.collectEntries { String dimension2Value ->
            switch (dimension2Value) {
                case "Dimension2.A":
                    return [(dimension2Value): ["Dimension3.A", "Dimension3.B"]]
                case "Dimension2.B":
                    if (dimension1 == "Dimension1.A") {
                        return [(dimension2Value): ["Dimension3.A", "Dimension3.C"]]
                    } else {
                        return [(dimension2Value): ["Dimension3.A"]]
                    }
                case "Dimension2.C":
                    return [(dimension2Value): ["Dimension3.B", "Dimension3.D", "Dimension3.E"]]
                default:
                    return [(dimension2Value) : []]
            }
        }

        return [(dimension1): dimension2WithDimension3]
    }
}