
Overview
Import Manager lets users upload, review, validate, and apply changes to Pricefx Master Data and Price Setting data. It has been introduced as a replacement for the Excel Client. Changes are validated before they are applied, can be edited inline, and can be routed through an approval workflow. Import Manager also supports Edit Mode changes, so data can be maintained directly without an export and re-import.
Three things distinguish it from a plain import:
-
validation visibility before anything is committed,
-
inline editing and mass actions on the uploaded data,
-
optional approval workflows per target object.
Import Manager or Direct Import?
Use Import Manager when a change needs review, validation visibility, inline editing, mass actions, or an approval workflow. Use Direct Import only for the targets it supports and only when the change needs none of those.
Direct Import is available for Product Extensions, Customer Extensions, Seller Extensions, and Company Parameters. It is not available when the source table is protected by an applicable Import Manager workflow, or when the user does not hold a manage-level role for the target. General Admin and General Admin without User Management can edit workflow-protected data directly and can use Direct Import.
|
Criterion |
Import Manager |
Direct Import |
|---|---|---|
|
Validation before commit |
Yes, with per-row status and error detail |
No |
|
Inline editing and mass actions |
Yes, up to 10,000 rows per mass action |
No |
|
Approval workflow |
Yes, per Target Object and Target Specifics |
No |
|
Change history |
Yes, retained on the list page |
No |
|
Supported targets |
All targets listed under Supported targets |
Product, Customer and Seller Extensions; Company Parameters |
|
Blocked by a protecting workflow |
No, this is the required path |
Yes, except for General Admin roles |
Supported Targets
Since version 16.0, Import Manager supports the following targets from the Unity user interface: Products, Customers, Sellers, Product Extensions, Customer Extensions, Seller Extensions, Competition Data, BoM Data, Product References, Company Parameters, Price Lists, Manual Price Lists, and Live Price Grids (LPGs).
Which fields can be changed within a target depends on the target table, its metadata, the user's permissions, and whether a field is read-only. Approval workflows are configurable for a subset of these targets only; see Target Object and Target Specifics.
The Import Workflow
A complete import has seven steps.
Step 1 — Export the data
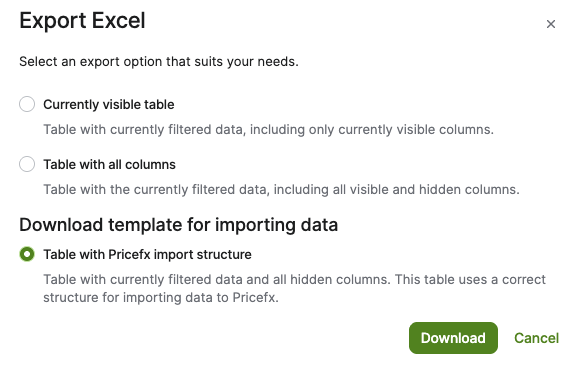
Export the table you want to edit. There are two ways to do this:
-
Click Export > Export Excel, select the option Table with Pricefx import structure and click Download. The downloaded file will include all the table data (filtered if an advanced filter is applied).
-
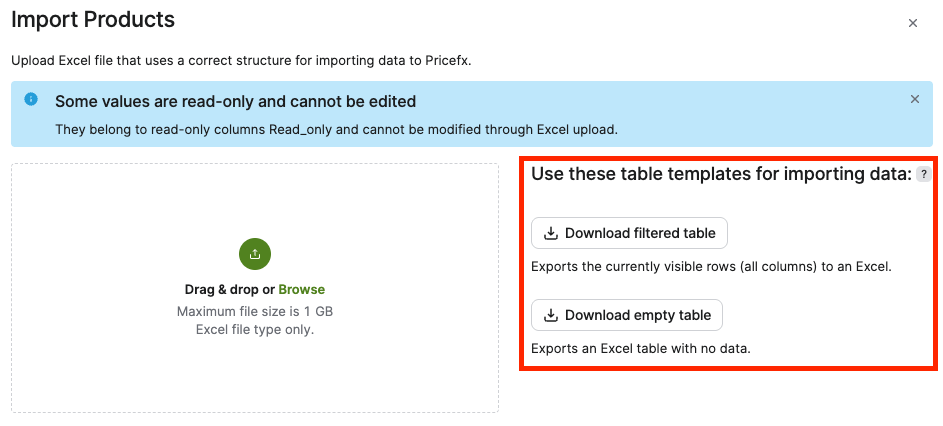
Click Import Products and select one of the available templates:
-
Download filtered table — downloads an Excel sheet with the data (filtered if an advanced filter is applied).
-
Download empty table — downloads an Excel sheet without data, only with the table columns. Not available for Price Lists and LPGs. Use this when you only need to add new rows.
-
Apply an advanced filter before exporting whenever possible. A smaller file validates and uploads faster.
Step 2 — Edit the workbook
Import Manager reads XLSX workbooks produced by Microsoft Excel, OpenOffice, or LibreOffice. Google Sheets and other formats must be converted to XLSX before uploading. The maximum upload size is 1 GB; the browser in use can lower the size the server will accept in practice.
Observe the following rules when editing:
-
Convert formulas to static values, for example with Paste Values. Formulas are not evaluated on import.
-
Leave read-only columns empty. For Price Lists and LPGs, added rows and changes to read-only columns are rejected and reported as errors.
-
Do not change business keys on existing rows. Business-key values may be supplied for new rows.
-
Do not create duplicate business keys; they cause the import to fail. If the target has no business key defined, the Import button is disabled.
-
Do not populate system-controlled fields on new rows.
In the downloaded file, the columns that are read-only in Pricefx are shaded light grey. The whole column is shaded, not only the header. Editable columns keep their standard formatting.
Step 3 — Upload the file
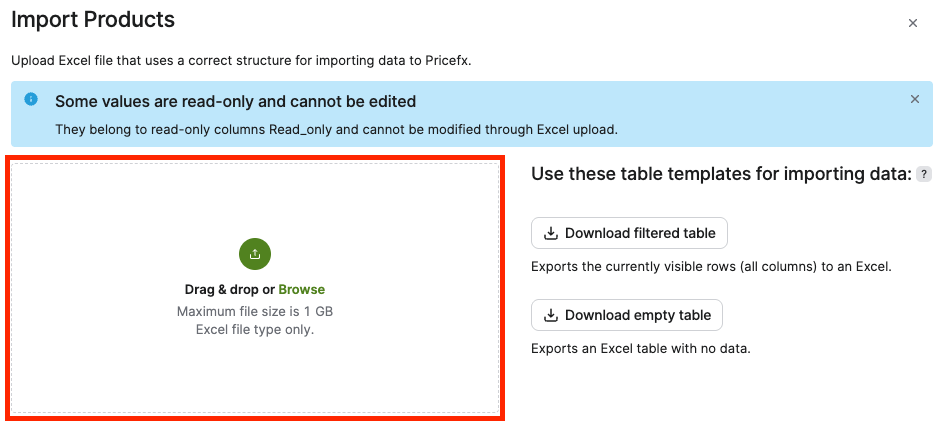
Go to Import Products and either browse for the file or drag and drop it. The upload runs as a background job, so it takes 30 to 60 seconds to start even for small files. The Import Manager screen opens automatically when the job finishes.
Step 4 — Review the validation results
The Import Manager screen shows the imported data, the target it will be written to, and a counter of item types and statuses. Clicking a counter filters the table. Cells with changed values or errors are highlighted; hover over the icon for detail. The full change log is available in the upper right corner. To replace the uploaded data, click Upload new file. This discards every change made on the Import Manager screen since the original upload.
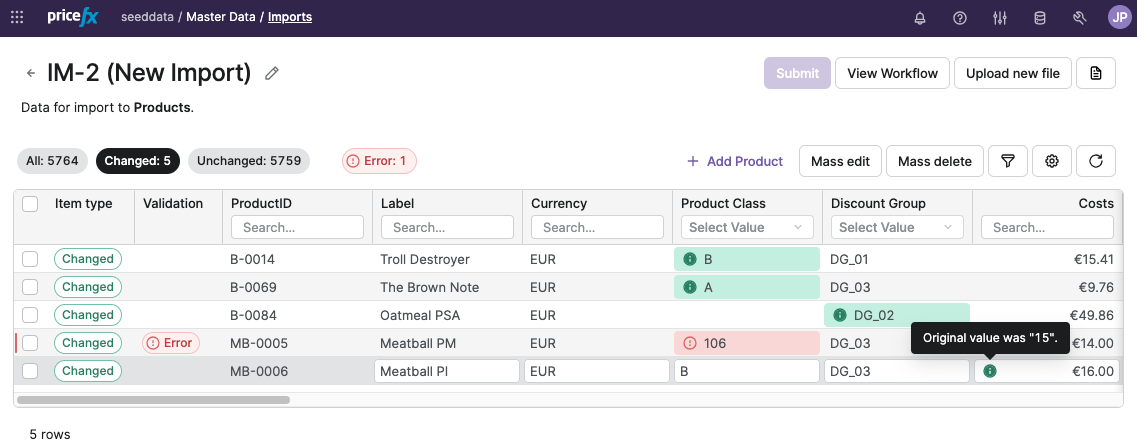
Validation covers required fields, dropdown values, numeric values, read-only fields, duplicate values, and other table constraints. Every row is classified with one of four statuses:
|
Status |
Meaning |
What to do |
|---|---|---|
|
Changed |
An existing row contains a valid change. |
Review the changed cells and keep or correct the values. |
|
New |
A new row passed the available validation checks. |
Confirm the business key and the required values. |
|
Deleted |
An existing row was removed from the uploaded workbook. |
Confirm that the deletion is intentional. |
|
Error |
A row or field failed validation. |
Correct the value on the Import Manager screen or fix the workbook and upload it again. |
Step 5 — Edit rows and use mass actions
Rows can be edited, added, and deleted directly in the Import Manager screen. Mass edit and mass delete apply to up to 10,000 rows at a time.
An empty Import Manager can also be created without uploading a workbook, from the supported master-data and price-setting screens. This is the Edit Mode path: it gives direct editing with change tracking and, where configured, approval.
Step 6 — Submit the import
Review the summary and the affected rows, then submit. What happens next depends on the target and the workflow configuration:
-
No applicable workflow — the change is applied directly, subject to the user's permissions and the import mode.
-
Applicable workflow — the import enters the approval process, for example
DRAFT → SUBMITTED → APPROVEDorDENIED. Its content is locked and cannot be edited while it is under review. When approval is genuinely required, Direct Import is disabled for that import too — see Workflow Outcome. -
Validation errors outstanding — submission is blocked until the errors are resolved or the affected rows are removed.
Step 7 — Track the result
After submission, monitor the import status and review any warnings or errors. For workflow-controlled imports, approvers review the submitted changes and approve or reject them according to the configured workflow. If the import fails, use the validation detail to identify the affected rows, correct the data, and submit a new import.
Import Manager List Page
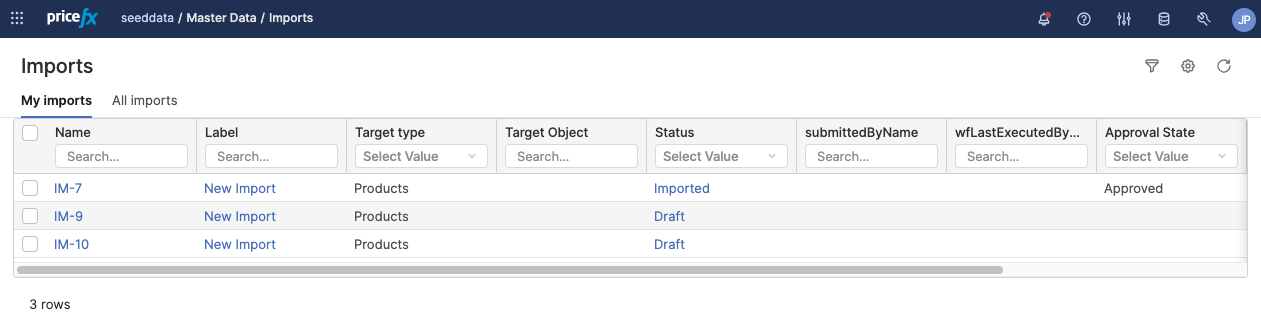
The list page shows current and past imports, so changes can be reviewed and tracked and drafts can be resumed. To access it, go to Master Data > Imports.
-
My Imports — imports created by the currently logged-in user.
-
All Imports — all other imports the user is entitled to access.
Imports are not kept indefinitely; see Retention and Cleanup.
Configuration
Access and Permissions
A manager-level user role is required to import data and to perform Import Manager actions. In addition, the user must hold the required permission for the target object and belong to any applicable User Group (Edit) restriction.
When an Import Manager workflow protects a table, regular users must go through Import Manager; the protected values cannot be edited directly on the master-data screen. General Admin and General Admin without User Management remain able to edit guarded data directly and to use Direct Import.
Permissions for managing workflows are separate from permissions for submitting and approving imports. Configure workflow-management permissions for administrators and workflow-approval permissions for approvers.
Workflow Logic Setup
Configure Import Manager workflows in Administration > Logics > Workflow logics > Import Manager Workflow Logics. The workflow type is Import Manager. Each workflow logic carries the following settings:
-
Name — identifies the workflow logic.
-
Label — describes the workflow so administrators can distinguish it from others.
-
Target Object — the type of data the workflow protects.
-
Target Specifics — narrows the workflow to one table or price-setting type, where the target supports it.
-
Valid after and logic status — together determine which active workflow is eligible.
Keep overlapping rules deliberate: use a specific workflow for a single table or type and a default workflow for the remaining targets of the same Target Object. Never create two workflow logics with the same Target Object and Target Specifics combination — duplicate scope is not currently prevented by the application, so it must be avoided by convention.
Target Object and Target Specifics
Target Specifics depends on the selected Target Object. Table names are supported for PX, CX, SX, and PP. Price List and LPG types are identified by headerTypeUniqueName. P, C, SL, and MPL support the default scope only.
|
Target Object |
Target Specifics |
Meaning |
|---|---|---|
|
Products (P) |
Default all |
Applies to the Products target. |
|
Product Extensions (PX) |
Default all, or table name |
Use a table name to protect one Product Extension table. |
|
Customers (C) |
Default all |
Applies to the Customers target. |
|
Customer Extensions (CX) |
Default all, or table name |
Use a table name to protect one Customer Extension table. |
|
Sellers (SL) |
Default all |
Applies to the Sellers target. |
|
Seller Extensions (SX) |
Default all, or table name |
Use a table name to protect one Seller Extension table. |
|
Price Lists (PLI) |
Default all, or headerTypeUniqueName |
Use the Price List type to protect a specific Price List type. |
|
Live Price Grids (PGI) |
Default all, or headerTypeUniqueName |
Use the LPG type to protect a specific LPG type. |
|
Company Parameters (PP) |
Default all, or table name |
Use the table name to protect one Company Parameter table. |
|
Manual Price Lists (MPL) |
Default all only |
The implemented model supports the default scope only. |
Workflow Outcome
Import Manager supports standard Pricefx approval workflows. When an import is submitted, the applicable workflow logic is evaluated. If the workflow logic determines that approval is required, Direct Import is disabled for that import: it must be submitted for review instead, and it follows the configured workflow — for example DRAFT → SUBMITTED → APPROVED or DENIED — with its content locked while under review. The existence of an active Import Manager workflow logic does not by itself mean Direct Import is disabled; only a logic that requires a real approval for the proposed changes does. This prevents users from bypassing a required approval while allowing imports that do not require approval to proceed directly. If approval is not required, the import proceeds directly according to the user's permissions and the import mode.
For integrations and diagnostics, the importmanager.fetchconfiguredworkflows endpoint returns the active, valid workflow configurations with their id, targetObject, and targetSpecifics. Inactive and non-valid workflows are not returned.
Retention and Cleanup
Import records are deleted automatically after a period of inactivity. Drafts and imports in Error status are deleted after 7 days; imports in Finished status after 30 days. Both thresholds are configurable in the cluster config.xml, up to a maximum of 365 days. Changing the setting requires a HelpDesk ticket.
Performance Guidance
-
If you only intend to make a few changes, edit the table cells directly in Edit Mode; there is no need to export and re-import.
-
Download and upload the smallest practical data set.
-
Apply an advanced filter before downloading existing data. Use Download filtered table instead of the full table when you only need to edit or add a few rows.
-
Use Download empty table when only new rows are needed and existing data is not required.
-
Avoid uploading unchanged rows.
-
Split very large updates into smaller batches.
-
Allow for background processing time; large imports on AWS can hit a hardcoded three-minute timeout.
Troubleshooting
When an import fails, or a user cannot find an expected option, check the following in order:
-
Confirm the target object and the exact table or Price List/LPG type.
-
Confirm that the user holds the required target-object permissions and belongs to any relevant User Group (Edit) restriction.
-
Check whether an active Import Manager workflow applies to the target, and whether its Target Specifics is Default all, a table name, or a headerTypeUniqueName.
-
Check that no second workflow logic exists for the same Target Object and Target Specifics, and review the Valid after and status values.
-
Confirm that the workbook is a valid XLSX file, no larger than 1 GB, and contains static values rather than formulas.
-
Check business keys, duplicate rows, required fields, dropdown values, numeric values, and read-only columns.
-
For large loads, reduce the batch size and allow for background processing time.
Common User Mistakes
-
Uploading a file with formulas instead of static values.
-
Changing a business key on an existing record.
-
Filling a read-only column.
-
Uploading duplicate business keys.
-
Expecting a new row to populate system-controlled or read-only fields.
-
Using Direct Import when the target is protected by an Import Manager workflow.
-
Uploading the entire data set instead of a filtered or minimal change set.
Terminology
-
Import Manager — the guided import path with validation, inline editing, mass actions, and optional approval workflow.
-
Direct Import — the direct write path for a limited set of targets, without validation review or approval.
-
Import Manager screen — the page that opens after upload, showing the imported rows, their statuses, and the change log. Referred to consistently by this name (previously called the "detail page").
-
Edit Mode — creating an empty Import Manager from a master-data or price-setting screen and editing rows directly, without an export and re-import.
-
LPG — Live Price Grid.
-
Target Object — the type of data a workflow logic protects, for example Products or Price Lists.
-
Target Specifics — the narrower scope within a Target Object: Default all, a table name, or a headerTypeUniqueName.
-
headerTypeUniqueName — the identifier of a Price List or LPG type, used as Target Specifics for PLI and PGI.
-
Business key — the field combination that uniquely identifies a row in the target table.